S-chess ramblings
Rules of the game
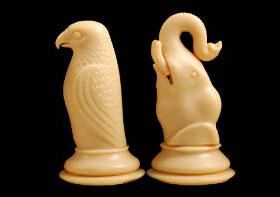
S-chess introduces two new pieces to the game: the elephant and the hawk. The elephant moves (and captures) as a rook+knight, while the hawk moves (and captures) as a knight+bishop. This is similar to how the queen is essentially the combination of the rook and bishop into a single piece.
The game starts as the same start position as standard chess. To bring the hawk and elephant into play, one must play a piece from the first rank. On the same move, the player has the option whether or not to drop or gate either the hawk or elephant onto the square from which the piece has just vacated. Just like en passant, it must be done on that move, otherwise, the player forfeits the right to gate on that square.
When castling, a player can gate on either e1/h1 or e1/a1, but may only gate a single piece. Thus with castling a player can essentially move three pieces at once.
A player cannot gate to block a check (i.e. a move must be legal without gating).
More information on the history of the game and clarification of rules can be found on the s-chess website http://www.seirawanchess.com.
Basic Gating
In the following positions, assume that each side can gate with the Elephant/Hawk if it is not on the board.
After learning the basic rules to this game, the question is: where should the pieces be gated? When one thinks about the elephant, as a rook-like piece, it should probably be gated on an open-file or supporting the center, like a queen. Thus, an opening like 1. d4 d5 2. c4 e6 3. Bf4/E makes a lot of sense, having the elephant already supporting the c4-pawn and putting pressure on the c-file.
Another square that would make sense is on the e-file. In the event of the center opening up suddenly, gating the elephant on the e-file, especially checking the opponent king, can be especially useful.
When castling, one has the option to gate on either e1 or h1. Sometimes, the elephant may be useful on h1, where it can develop on g3 to attack g7. This is particularly true in closed e4 e5 structures, where the b8-h2 diagonal is closed.
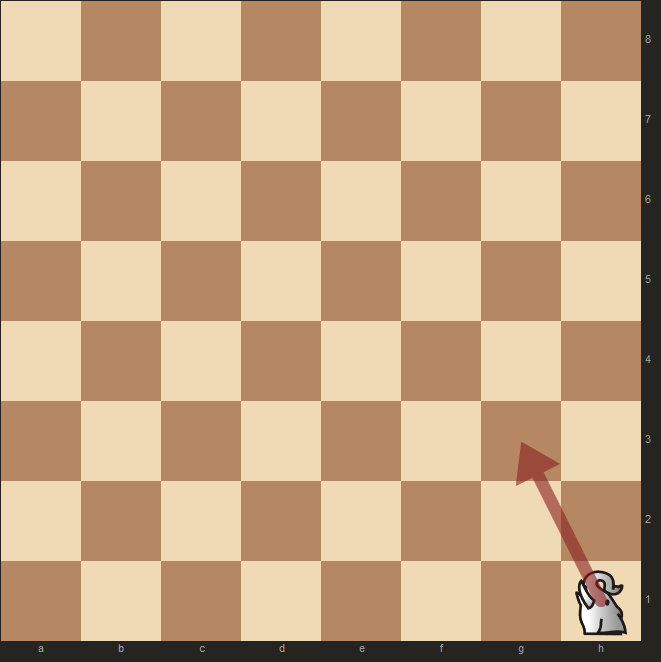
Finally, another decent square is the g1-square, which is possible in some d4 d5 positions or other relatively closed positions. There, the elephant facilitates the g5-push to harass black’s pieces.
In general, the elephant tends to be less dependent on specific gating position, as its mobility as an orthogonally moving piece means that it can find a useful square relatively easily.
The Hawk, on the other hand, is a tricky piece to gate. If we think of it as a knight-moving piece on the back rank, it does not matter as much where it is gated, as knights normally tend to need several moves to reach an ideal position. Thus, we should think of it more as a bishop-moving piece, and put it on a useful diagonal.
The instinct may be to put it on h8/a8, where along with a fianchettoed bishop it may wreak havoc. However, in practice it is not nearly as simple to make such a construction work. The second instinct may be to gate it in b1/b8, which is fairly common:
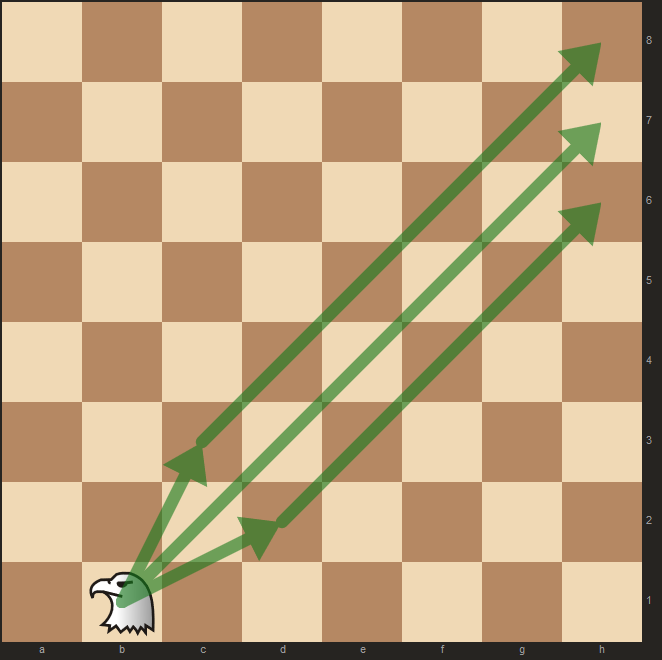
On b1, the hawk is supporting the e4-square, thus controlling the center. It is also putting pressure on the b1-h7 diagonal, questioning if black wants to castle. Furthermore, it can also support the center in various ways with Hc3 or Hd2, switching diagonals.
In general, as white it is good to avoid gating pieces on f1/g1 prior to castling, given that the position has the possibility of becoming open in the future. If we think of the main “goal” of the opening as developing and castling, gating in between the castling path only prevents white from maintaining his development advantage.
Of course, there are exceptions to every rule. For instance, it is entirely plausible to gate in between the castling squares if the opponent has also wasted tempi gating themselves.
Other decent squares include c1/f1, which we will cover in more detail in Gating tactics.
Gating tactics
The gating function in s-chess is at first glance a natural way to develop the hawk and elephant into the game. However, with just a little bit of thought, it is easy to realize that gating can be quite dangerous. For instance, consider the position after 1. e4 d5 2. d4 e5 3. dxe5 dxe4:
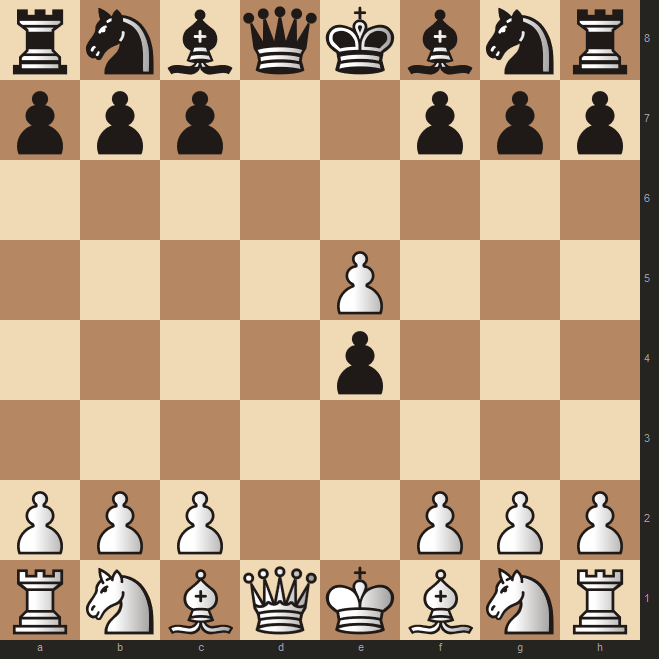
White would already be able to play 4. Qxd8/E mate!
Of course, black would be able to foresee this tactic coming and thus avoid it. Nevertheless, white with the first move advantage is in many cases able to open the center favorably, and use such gating tactics to his advantage.
One natural aspect of gating tactics is they tend to necessarily favor the longer range pieces, like the queen and bishops. In many cases, one would like to gate the Hawk on b1 or b8, where it has a useful diagonal to control. In some cases, however, this early gating can be a mistake:
(see diagram below)
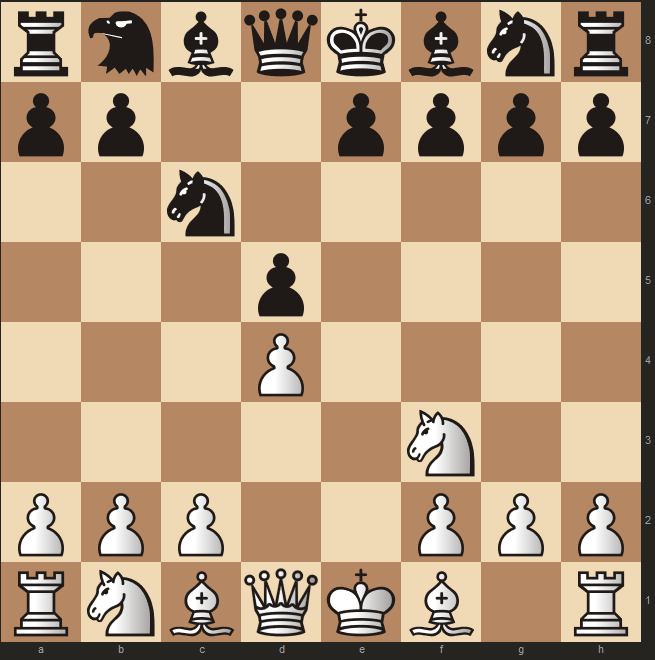
Black has just played 4…Nc6/H, and with normal play the Hawk would be quite useful on b8, controlling the center and potentially staring down on h2. However, white has the strong move 5. Bf4/H! developing a piece with tempo, and posing a question to the hawk. This is not the end of the story, but white already has a significant advantage.
Note that this gating tactic does not at all negate the development of the Hawk on b1/b8. First of all, in many positions, the simple interposition Bd3 or …Bd6 would suffice. In the next example, black has a more tactical resource at their disposal to combat the Bf4/H gating tactic.
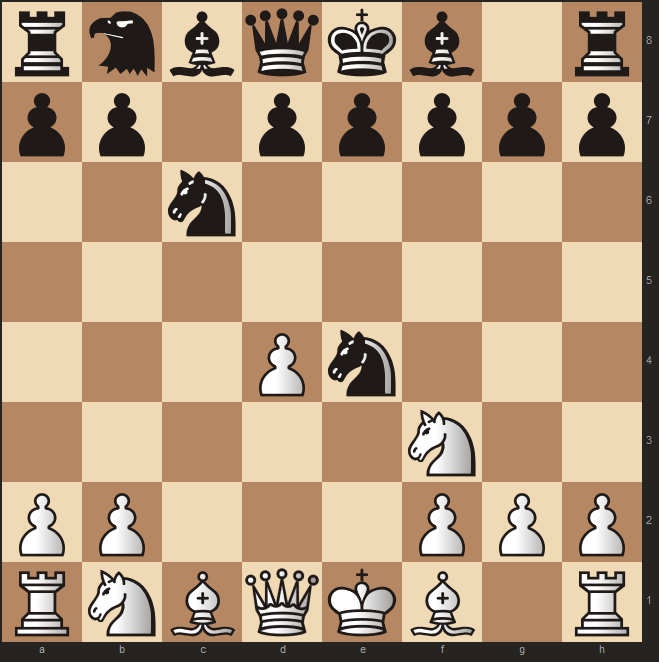
Here, white erroneously played 6. Bf4/H? e5! and now white has no good way to recapture: on 7. dxe5 Bb4+ with an elephant coming on e8 would give black a large development advantage, with the white pawn on e5 becoming quite weak. If 7. Nxe5, then Bb4+ 8. Nc3/E d6 and black is no longer worse, gaining multiple tempi on the white pieces and getting ready to castle.
Instead, much more dangerous was 6. d5! Ne5 7. Bf4/H, denying black an easy path to develop their pieces. Instead, black now has to contend with the pin on the Hawk, and white has a natural development path with an elephant on e1.
An important function of gating tactics is the indirect protection of a piece:
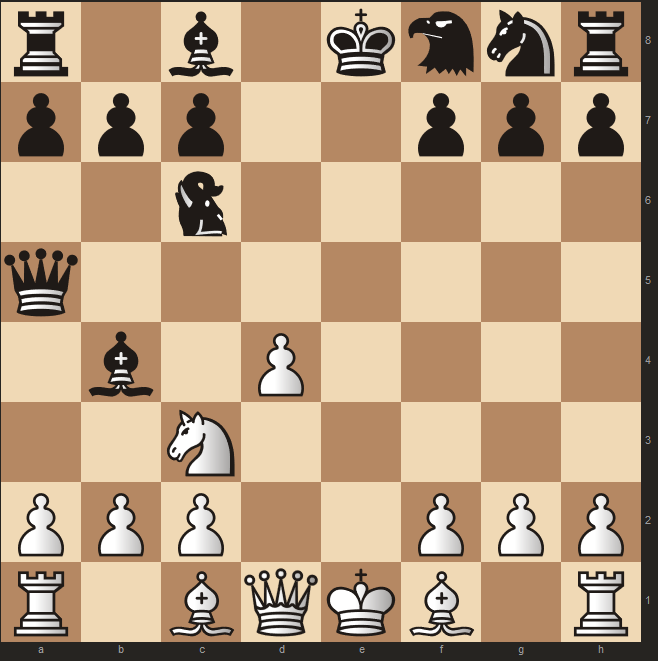
If this was a chess position, black would be alright because 1. Bb5?? would run into Qxb5, winning a full piece. However, in s-chess, white has 1. Bb5/H!, and the bishop is protected by the Hawk. Suddenly, it is instead white that is winning an elephant for a bishop.
So far we have seen some gating tactics with the Hawk, which have been connected with the bishop movement. Thus, gating tactics with the elephant must be connected with the movement of the queen. As a side note, gating on e1/e8 with check is something that must also be considered.
Continuing with the theme of indirect protection, pushing the d-pawn can be an excellent use of refraining from an early gating of the elephant:
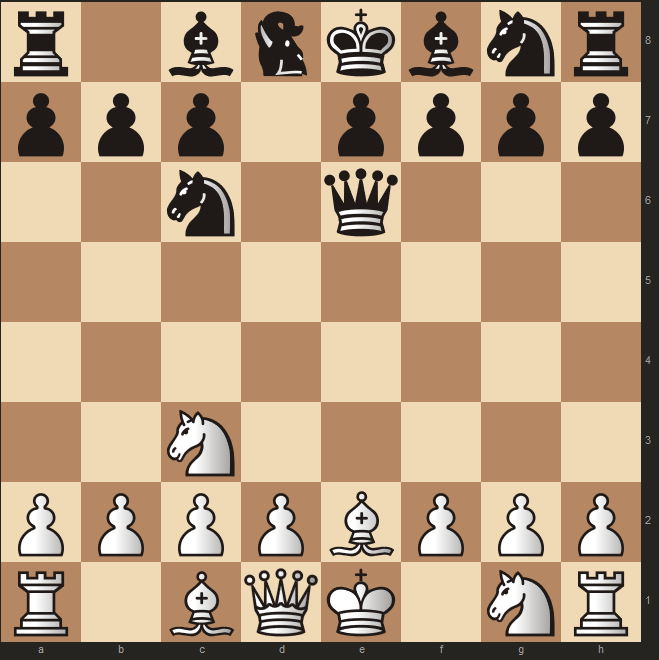
Here, black controls the square d4 twice, and seems to have a solid grasp of the center. However, white is not impressed, and anyway plays 1. d4! Black, unimpressed, continues 1…Nxd4, but after 2. Qxd4/E! Exd4 3. Exd4 white comes out with a piece advantage. Thus, the d4 pawn was protected by an indirect gating tactic.
Instead assume black played 1…Nf6 in response. Now white would have 2. d5! forking the queen and knight. Again, black cannot avoid loss of material due to the indirect protection of the pawn on d5.
Now, let us take a look at a full game with multiple gating tactics.
1. e4 e5 2. Bc4/E:
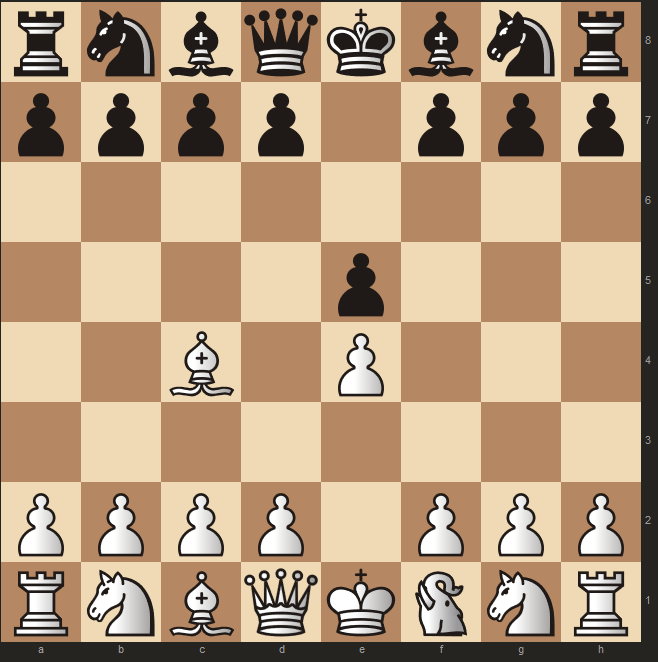
White has gated in between their castling path, and has also used their elephant, thus losing the option of using gating tactics along the e or d-file. Of course, this move is no mistake, and the position is fairly balanced. A more tactical approach may have been 2. d4!?
2…Nf6 3. Eg3 c6 4. d4 d5:
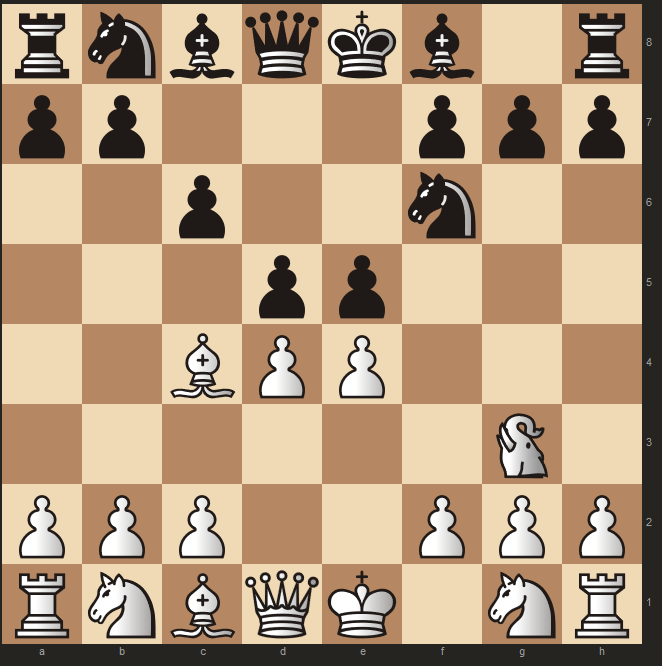
The game has suddenly transformed into a tactical slugfest, with the center opening up rapidly. This opening of the center, beginning with 3…c6, should favor black, because they can gate their elephant on the central files. After 5. exd5 exd4 6. dxc6, black had to make a choice:
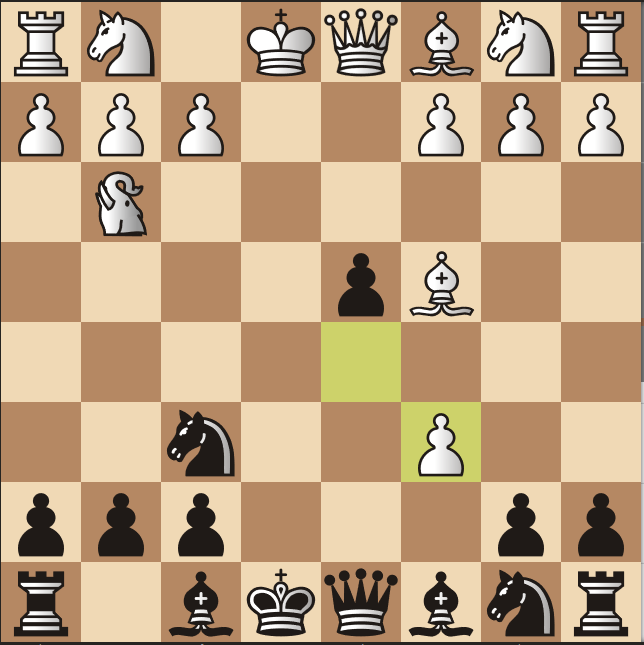
Indeed, there are many tempting options for black. Simplest would be 6…Bb4+ 7. Nd2 0-0/Ee8+ 8. Ne2 Bd6, after which black will gain tempi on the elephant, for instance after 9. Eb3 Nxc6 black’s position is open, with Na5 further harassing the white elephant.
Another simple option was 6…Nxc6, reserving the Bb4 and 0-0/Ee8 combo for the next move.
Instead, black chose 6…Nxc6/H, after which white responded with 7. Bf4/H?!
(see diagram below)
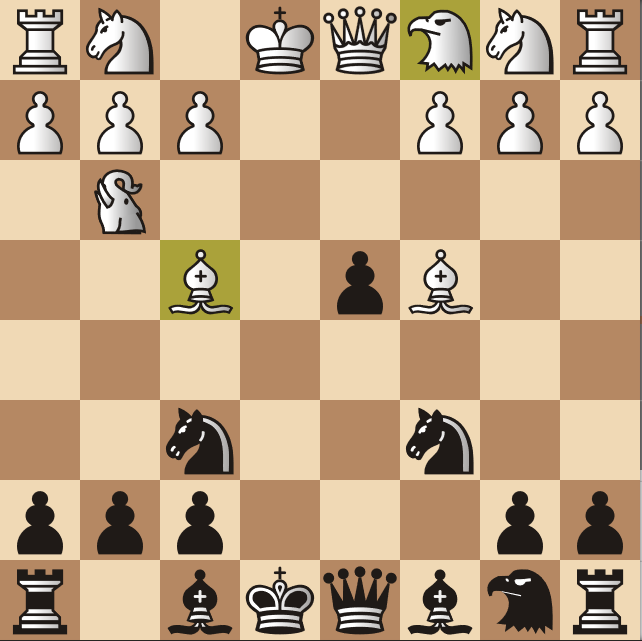
Black has a remarkable combination: 7…Bd6!! allowing 8. Exg7+, seemingly a devastating pawn to lose. However, black has the incredible response 8…Kf8/Ee8+!.
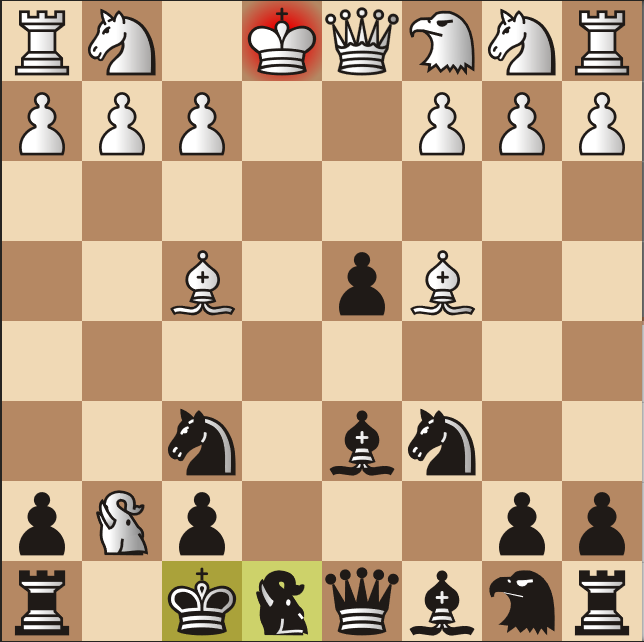
After the forced sequence 9. Exe8 Qxe8 10. Nge2 Bxf4 we see that black emerges a piece ahead.
Of course, white is not forced to take on g7. Instead, after 8. Ee2+ Kf8/Ee8 the game remains complicated, although black is slightly better due to their slight lead in development and initiative.
New pieces & Tactics
The Hawk and Elephant bring many new tactics to the game, and are especially tricky due to their knight movements. One has to watchout for various forks in every position, as they can be very unexpected. Normally we are used to the queen as a fairly direct attacking piece, but the Hawk and Elephant can launch attacks in highly unexpected manners, because they are combined with the knight.
Although it will undoubtedly take many games to establish mating patterns, tactics, and how the new pieces synchronize with other pieces, the pure tactics of the new pieces are already numerous. Let us take a look at a few of them:
Black to move (position from LegionDestroyer)
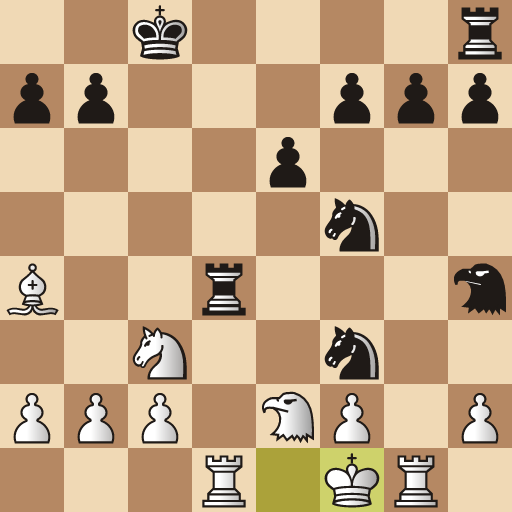
Here, we once again notice that while the He2 is placed relatively closely to the white king, it does a poor job of protecting it. Here, black even has a mate in two: 1…Ne3+ 2. fxe3 Nxh2#.
Black to move
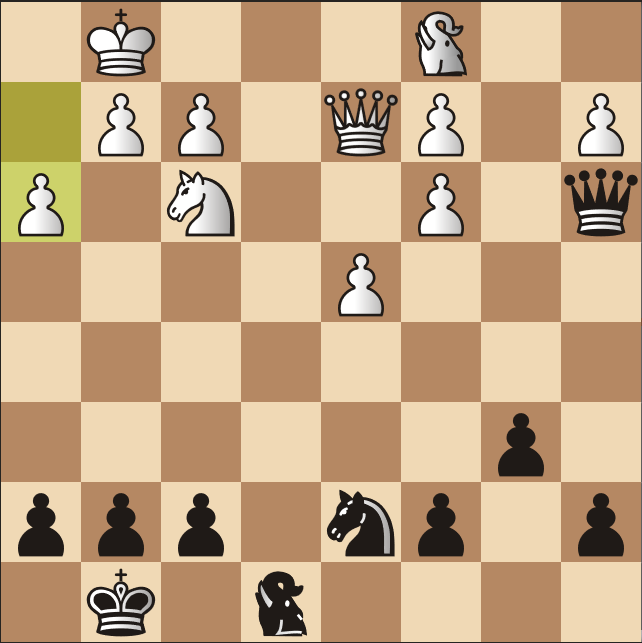
Another basic example of the tricky movement of the elephant/hawk. White has just blundered with 1. h3??. Black has 1…Qxc1+ 2. Qxc1 Ee2, winning an entire elephant.
Black to move
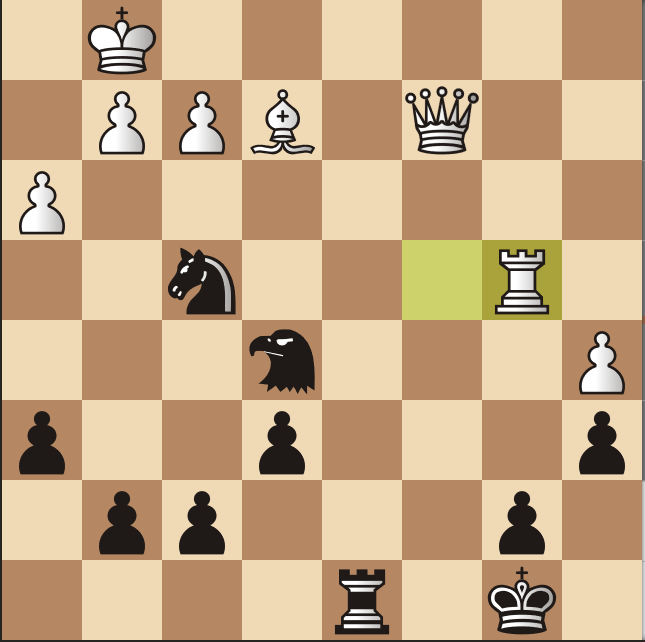
In this interesting balance of Hawk vs Queen, black has an interesting tactic: 1…Nxe2! 2. Qxe2 Hc3!, forking the queen and rook. White cannot defend adequately: If Qc4 (or Qg4) there is 3…Rd1+ 4. Kh2 He5, forking the queen and king:
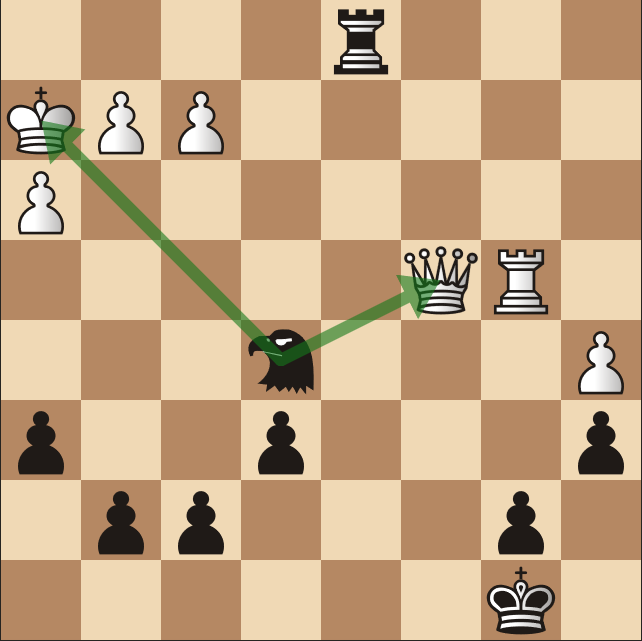
The dynamic of Hawk vs Elephant or Hawk vs Queen is a fascinating one, and I believe a dynamic in which the Hawk does not do badly. But before getting ahead of ourselves, we should establish the values of the new (combined) pieces.
The traditional piece value in chess is as follows:
1 - pawn
3 - knight
3 - bishop
5 - rook
9 - queen
4 - king (in the endgame)
While one can certainly debate much of the above (for instance increasing the value of the bishop/bishop pair) I believe the evaluation of the pieces changes significantly in s-chess. My proposed piece value is:
1 - pawn
3 - knight
3.5 - bishop
5 - rook
7.5 - hawk
8.5 - elephant/queen
I believe that in s-chess, as well as in chess, that roughly 3 pawns are equivalent to a piece. The hawk, in light of its lack of ability to control files, is worth less than an elephant or a queen. Perhaps the most surprising thing in this evaluation is the idea that a rook+minor is worth as much as one of the major pieces.
I believe this to be so because the addition of two pieces to both sides causes the board to become highly crowded. In a crowded situation, lower value pieces really tend to shine because they can control the same squares without being scared of being attacked. In traditional chess, middlegame queen sacrifices which work tend to be because of the activity of the remaining minors. If the queen establishes dominance on an open board, with many loose pieces, those queen sacrifices normally tend to not work as well.
Furthermore, while the chess board typically has a useful square for the queen, a rook can easily harass an elephant which means that sacrificing an elephant for a rook+minor allows you to move your pieces easier while the opponent must hide their pieces from being attacked.
The following are some ideas and tactics to get used to the dynamic potential of the new pieces.
Position1
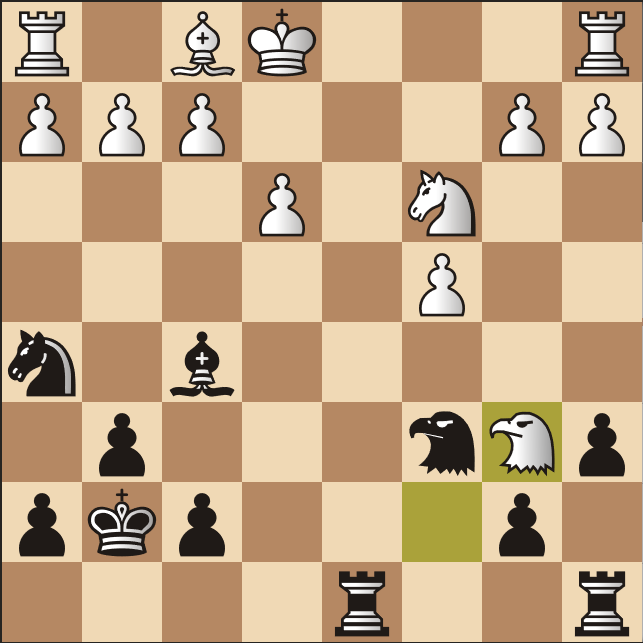
White is up two pawns. How should black increase the pressure?
16…Nf4! With this blow, black threatens Nxg2 and introduces another piece into the attack. Note that if the immediate Hb4, white has Rc1 and a3. Now white has two options:
17. exf4 Re8+ was the idea that we had both seen, and considered impossible for white. However, white can survive: 18. Kd1 Hb4 (if Rad8 then Nd5 holds) 19. Be2 (note that 19. Hd4+ does not help white Kf8! and 20. Nd5 would fall to Re1#. Instead, after 20. a3 Rad8 21. axb4 Rxd4 22. Bd3 Bxd3 the “chess” endgame is significantly in black’s favor) Rad8+ 20. Nd5 Hc2+ 21. Kd2! This is the difficulty of s-chess: the movement of the Hawk has suddenly become severely restricted. Differentiating between a highly dangerous hawk and a completely harmless hawk is not an easy task. Black can bail out with 21…Rxe2+ 22. Kxe2 Hd3 23. Kf3 He4+ with a perpetual.
17. f3 Hb4 18. exf4 Hc2+ 19. Kf2 Hxa1 was in black’s favor, and ended shortly after a blunder.
Position2
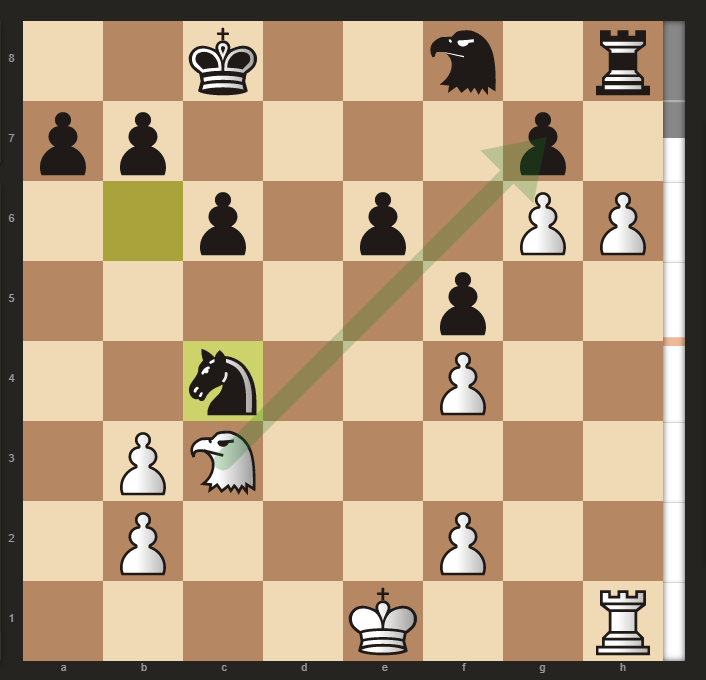
catask-opperwezen
Another hawk vs hawk battle, but one that went in opperwezen’s favor. Here, White played 28. Hxg7 with a tactical point: if 28…Hxg7 29. hxg7 black has no way to prevent promotion. Of course, opperwezen saw this and rebutted with 28…Hb4+ (technically better was Hxg6, but after bxc4 black has a difficult position)
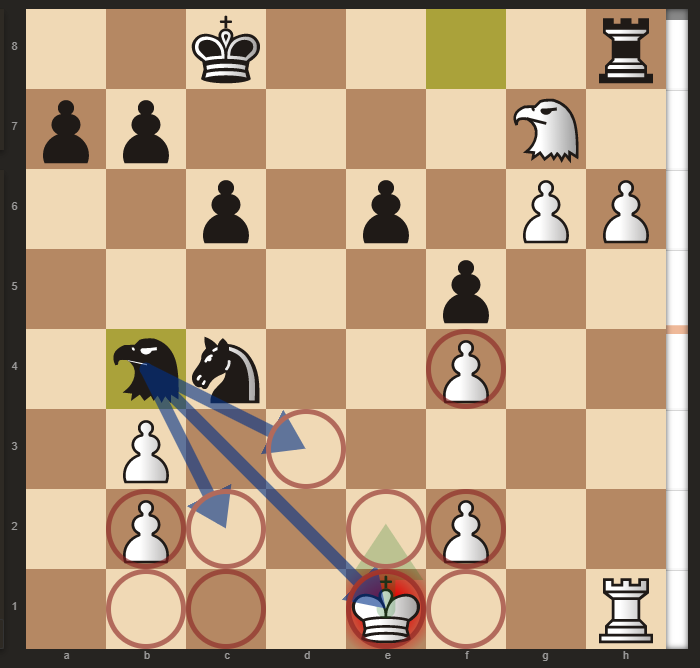
Notice that the Hawk on b4 does not seem that dangerous, as it is only attacking d3 and c2, besides giving a check. However, on d3 it suddenly becomes a force, wreaking havoc on the white king, which suddenly has very limited squares. The key is that after 29. Ke2!! White’s king dominates the hawk, which has no entry into the game. On 29…Rd8 30. Hxe6+ would end the game.
Instead, white chose 29. Hc3??, incorrectly believing that the hawk near the king would somehow protect it from danger. However, after 29…Hd3+ 30. Kd1 Nxb2+ 31. Kd2 Rd8 (more accurate was Hxf4+! when Kc2 Hd3 Kd2 is forced, and black picks up an extra pawn):
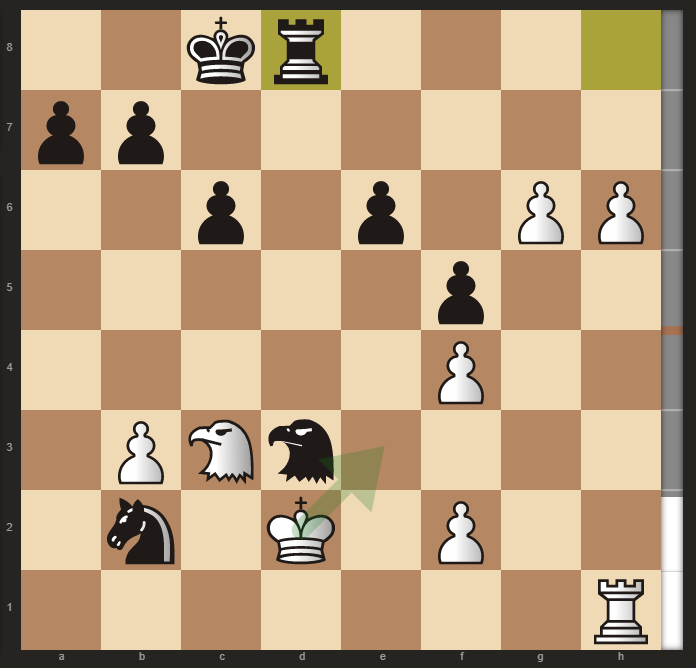
We can see that the Hc3 has little effect on protecting the white king, in contrast with, e.g. a Queen. The difference in one square has a massive effect on the placement of a hawk, which does not happen as often with the elephant or the queen. After 32. Rh3 black had numerous winning moves, and 32…Hxf4 33. Kc2 Hxh3 was more than enough to get it done.
While the first two examples were played with a relatively reduced force, in the next example we shall see a dynamic middlegame where the board is highly crowded.
Position3
catask-Stockfish level 8, a crowded middlegame
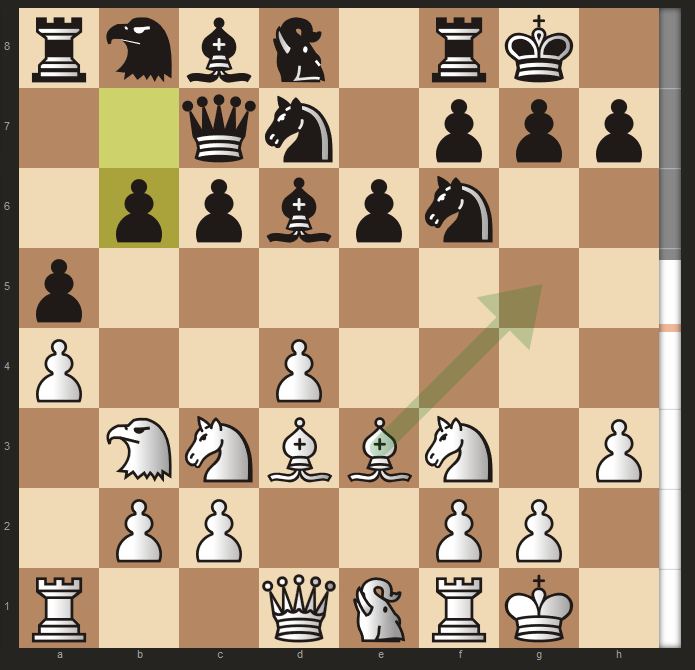
In this position, we see the effect that two additional pieces have on the game. Remarkably, both players have fairly cramped positions. White’s elephant, while not misplaced, hinders the natural Re1. Black, on the other hand, will have a difficult time connecting his pieces, but nonetheless remains solid. In particular, it is difficult to see what Black plans to do with the Hawk, never mind being able to play a move like Rad8 or Rc8 in the future as would be customary in chess.
But it is white’s move in the above position. What to play? A move like Bg5 might be natural, planning something like Ne4, increasing the pressure in the position. Another idea is Nd2, with the idea of Ef3 (If Bb4 or something similar, the simple g3 would suffice).
Instead, white chose 13. g4!? with the idea of Eg2, g5, and a kingside push. Indeed, it is clear that if black does nothing, this push will be quite dangerous. 13…Ba6 with the intention to trade off an attacker, as well as relieving a space deficit. 14. Eg2 Bxd3 15. cxd3!?
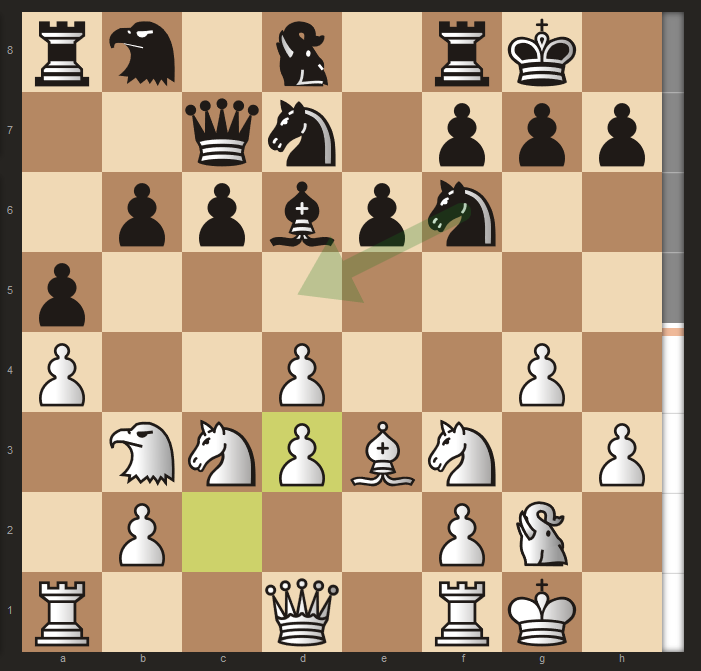
In just a few moves, the position has transformed dramatically. White seeks to gain space on the kingside, and has Ne4 as an outpost. Furthermore, the c-file may prove useful in the future. However, in s-chess the addition of new pieces means that black can also defend easier. In particular, the elephant is a powerful defensive piece, as we shall soon see.
15…Nd5 16. Ne4 Ee8!! With this move black’s elephant guards the squares g7 and f6, securing black’s king.
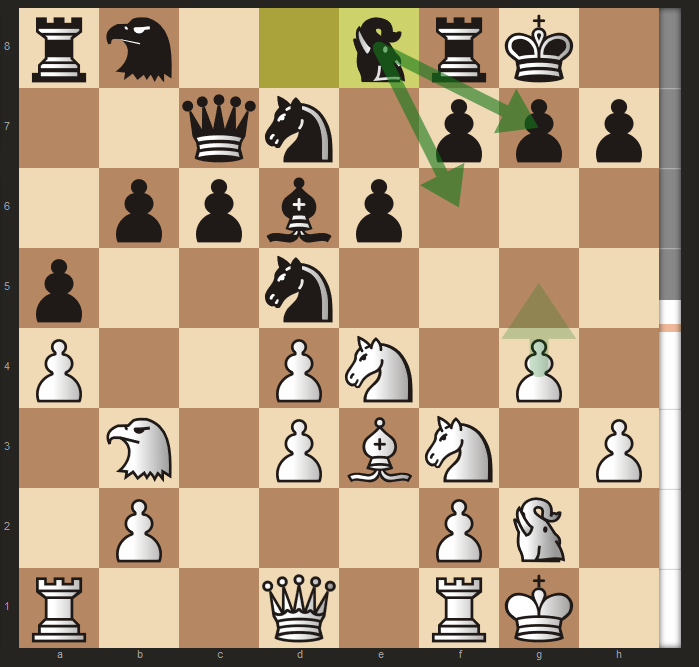
After 17. g5 black must figure out how to activate his hawk. A reasonable idea would be 17…Qb7!? Opening up the diagonal for the hawk, with ideas like Bf4 or f5 in the future. Instead, black played 17…Ha6 18. Rc1 (perhaps better was h4) Hc8!
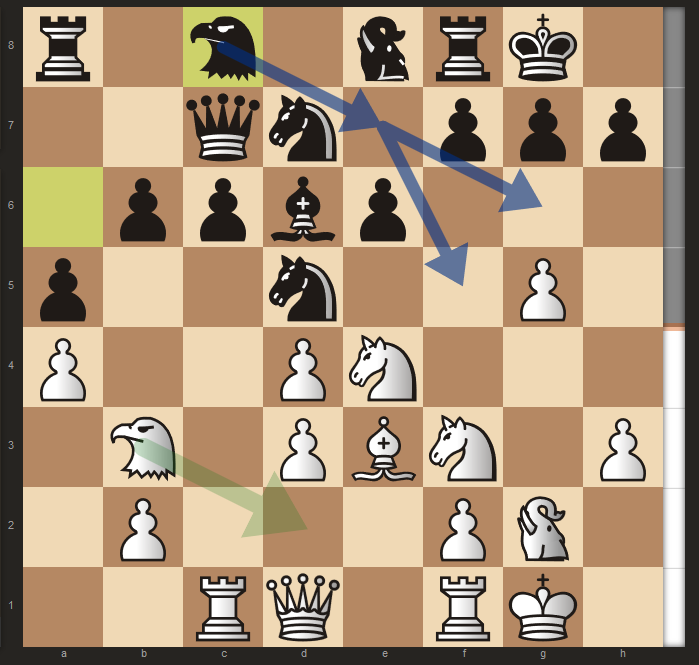
Not to be outdone, white played 19. Hd2 He7 20. Nxd6 Hxd6 21. He4 so as to regain control over the light squares, and bring their own hawk into the game.
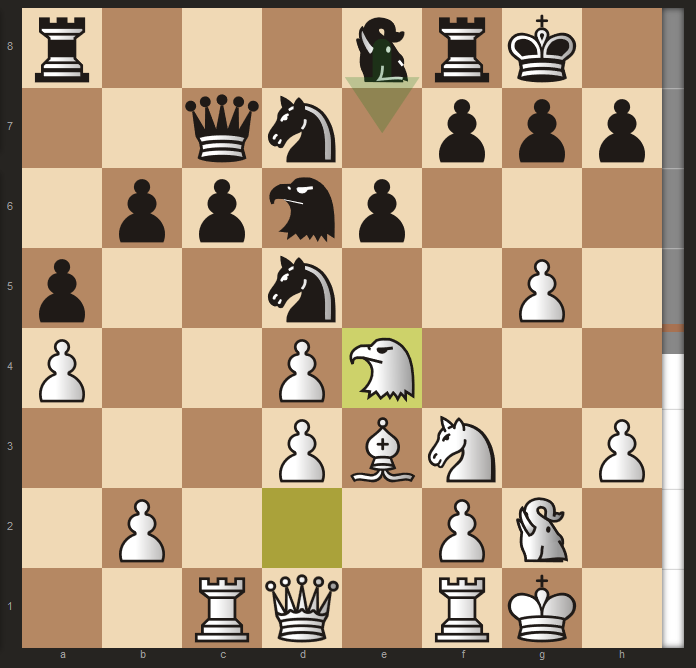
However, notice that white has traded many pieces. After 21…Ee7 black fixed his space deficit and can look forward to a complicated game with many imbalances (which black later won).
Finally, a game played by two engines, both based on stockfish.
Game1
FairySF - SeirawanSF, 40/900s + 30s
1. d4 d5 2. c4 e6 3. Nf3 c5
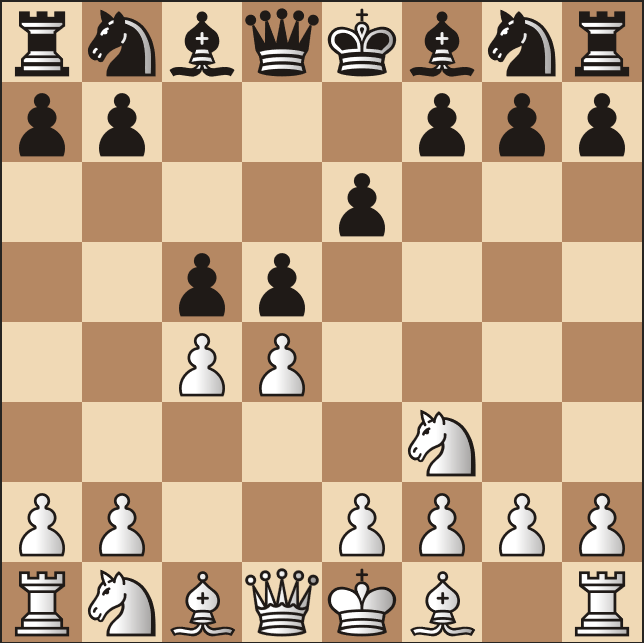
The Tarrasch defense, an opening leading to quite sharp positions. One thing I have noticed about seirawan-stockfish is that it does not like to play passively, even losing material or making positional concessions in order to open up its pieces. For instance, if black had instead chosen the standard QGD move: 3…Nf6 after 4. Nc3/H Be7 5. Bf4 0-0 6. e3
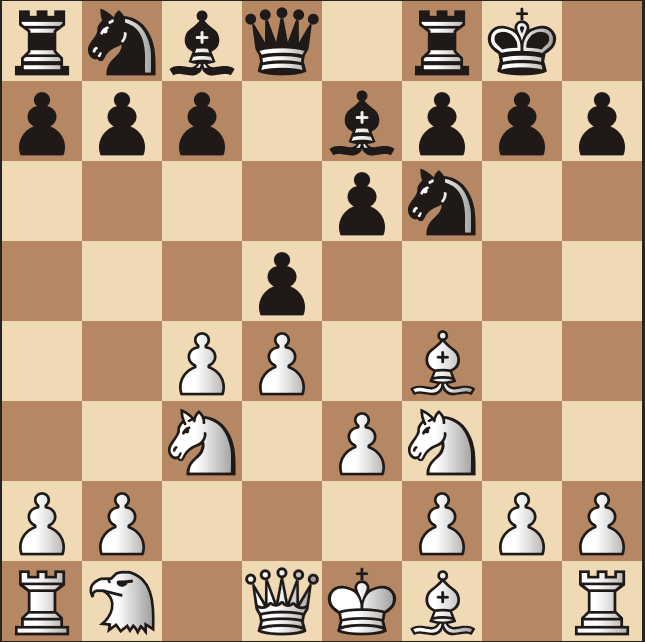
Hardly a forced sequence, but here white has (comparably) easier play, with the hawk already on a good square, and a slight space advantage. White could gate the elephant on e1, whereas it is not totally clear how black will finish their development, as both the hawk and elephant must now be gated on a8, b8, c8, or d8, all of which seem slightly awkward. Black could, of course, play c5 here to open the position, but then it probably makes more sense to do it earlier.
It bears mentioning that in classical chess this position is the start of a large tabiya, but in s-chess this position (in addition to the hawk on b1) carries completely new ideas. Back to the game,
4. cxd5 exd5 5. dxc5 (If 5. Nc3 Nc6 6. dxc5 Bxc5 7. Qxd5/E Qe7 black has good compensation with Nf6 and 0-0/Ee8 coming up) Nf6!? 6. Bf4/E Bxc5/H
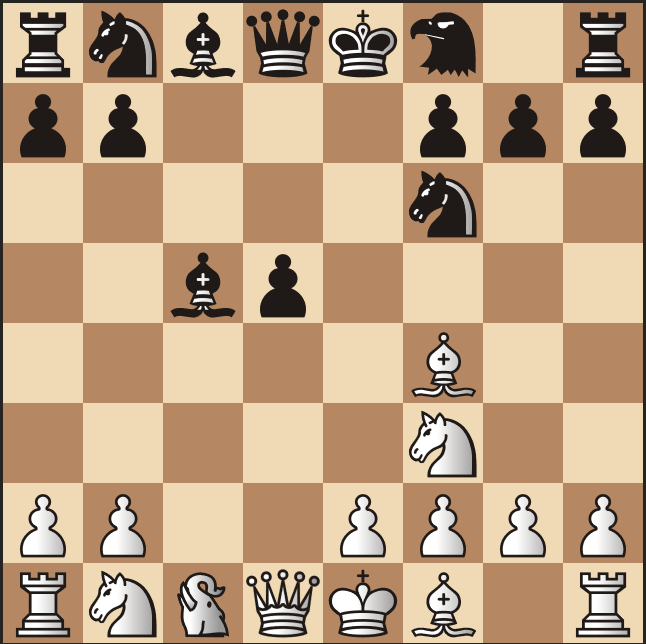
White has gated their elephant on c1, an open file. Black, on the other hand, has good play with a slight space advantage, but will have to spend an additional tempo to castle. In the following moves both sides develop their pieces.
7. e3 Nc6 8. Bd3 h6 9. Nc3 He6 10. 0-0/He1 0-0/Ee8
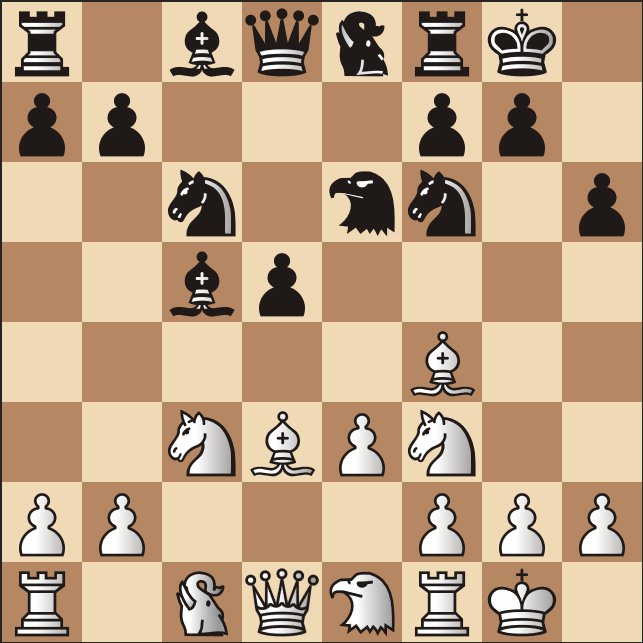
Now that both sides have castled and gated, it is time to take stock. We have a traditional IQP, with the addition of the hawk and elephant. White may think of Hc2 at some point, creating a battery with the hawk and bishop. Both sides find it difficult to develop their major pieces, with the Bf4 controlling many squares while black’s d5-pawn creates a cramping effect on the white forces. A solid continuation could have been 11. Bg3 Nh5 12. Nd4 Bxd4 13. Qxh5 Bf6, with good play for both sides.
Instead, white went for 11. Nb5!? Bb6 12. Ee2 (increasing control over d4) g5 13. Bd6 Exd6 14. Nxd6 Qxd6:
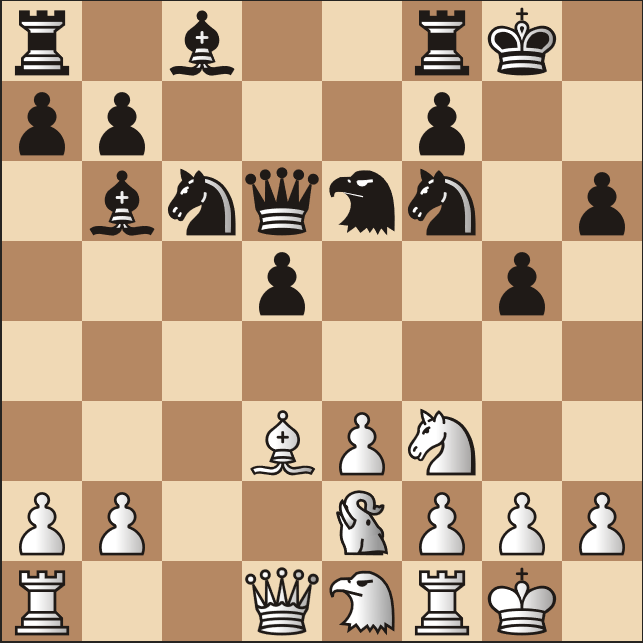
A highly interesting imbalance of two pieces for an elephant has arisen. Although white has traded off two minors, their major pieces still remain cramped without much future. Black’s minor pieces, on the other hand, exert control over the center. Over the next few moves, we will see white’s pieces heavily cramped by black’s forces, so while white shuffles around black steadily improves their position.
15. Hc2 Hg7 16. Ed2 Bd7 17. Rc1 Rae8 18. Kh1
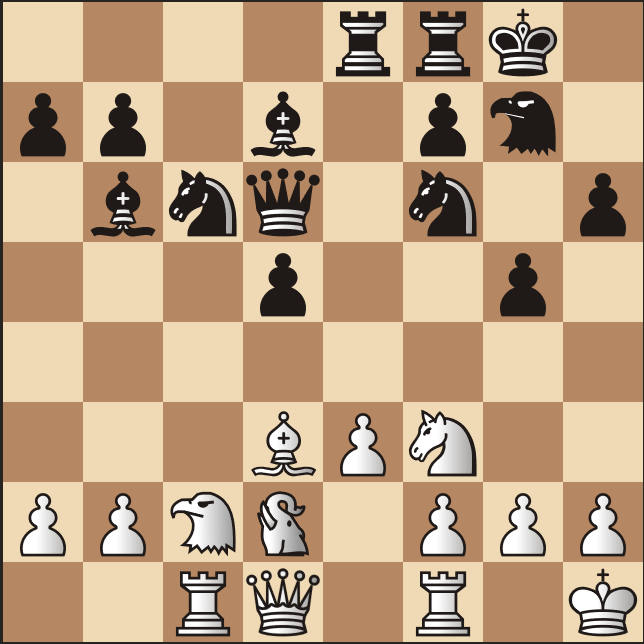
Notice that the pawn on g5 is not really a weakness, because the hawk on g7 cosily defends the black king. With the entire black force developed, it is time to strike: 18…g4! 19. Nh4 Re5
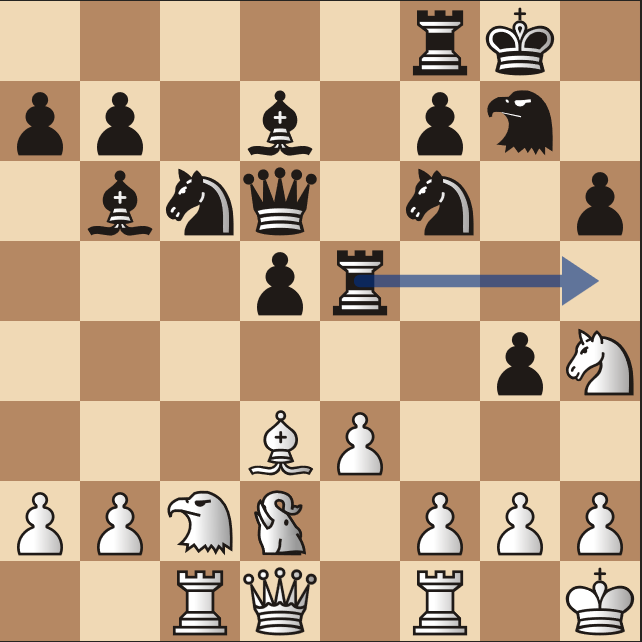
With the rook swinging over to g5, black is looking to provoke g3, after which the light square weaknesses around the white king will be irreparable. Notice that despite the material “deficiency,” black in fact has no weaknesses and white has an extremely tough time provoking them. For instance, after 20. e4 dxe4 21. Bxe4 Qxd2 22. Qxd2 Nd4! 23. Hxd4 Nxe4 white loses material:
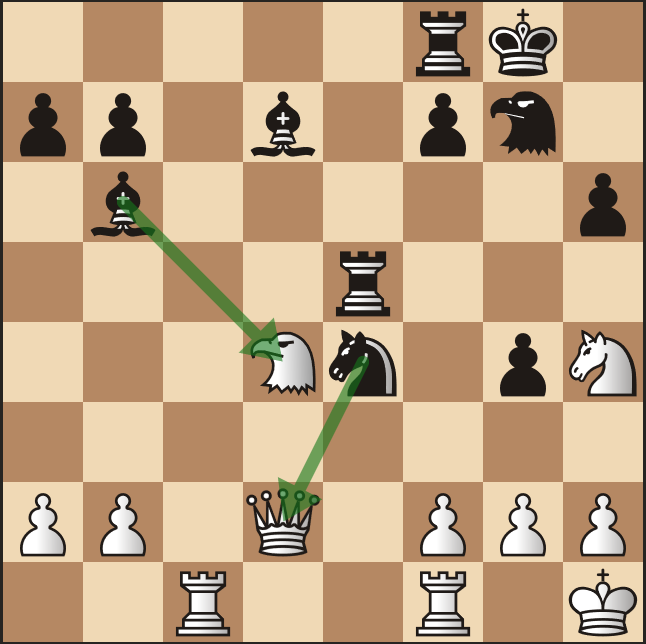
After something like Hxe5 Hxe5 black’s minor pieces continue to dominate the scene.
Instead, white chose 20. Ha3 Qb8 21. g3 Rfe8 22. b4 Rh5
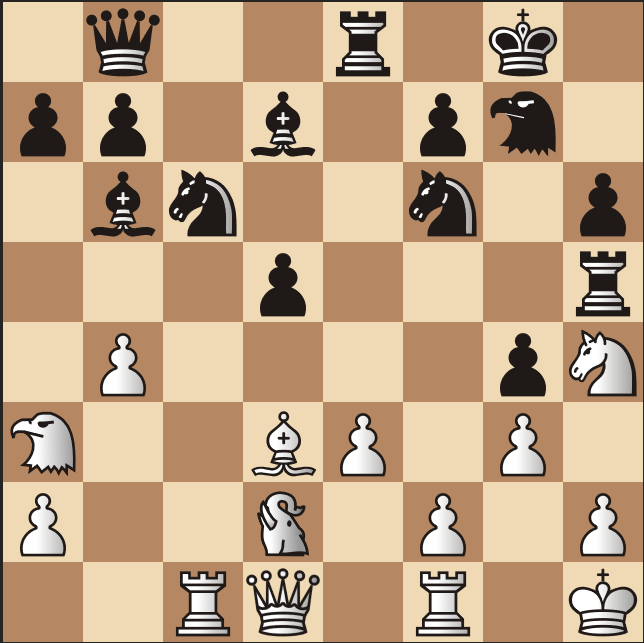
Clearly, white has simply resorted to making nonsense moves while black slowly but steadily piles on the pressure. Black’s next moves would likely be either d4 or Ne5, trying to open up the position. If white’s bishop left the b1-h7 diagonal, a move like Bf5-e4 could be devastating. In light of these developments, white desperately sacrificed the exchange with 23. Rxc6!? bxc6 24. Qb1 Qd6 25. Ng2 Rhe5
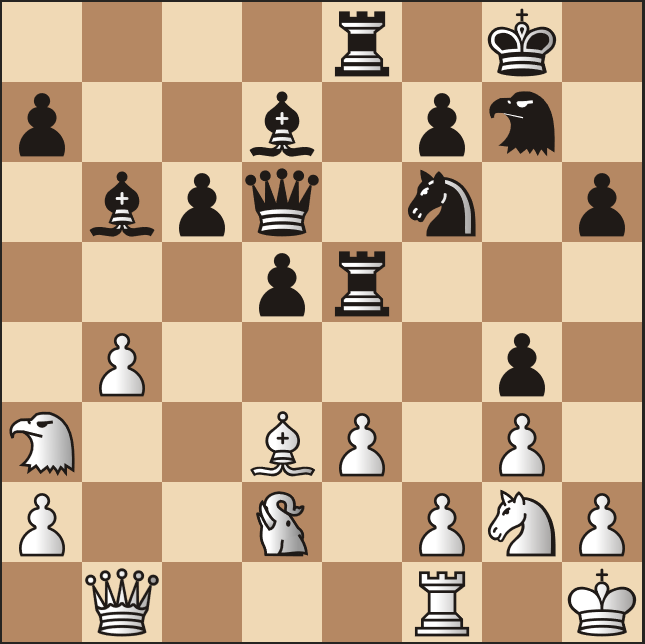
With the Ng2 heading to f4, the rook on h5 had little business staying there. Instead, black now prepares to open up the center with c5 and d4. If white tries to stop this with e.g. 26. Rc1 Ne4 27. Ef1 black could even increase the pressure by transferring the hawk to g5, with potential for jumping into f3 or h3.
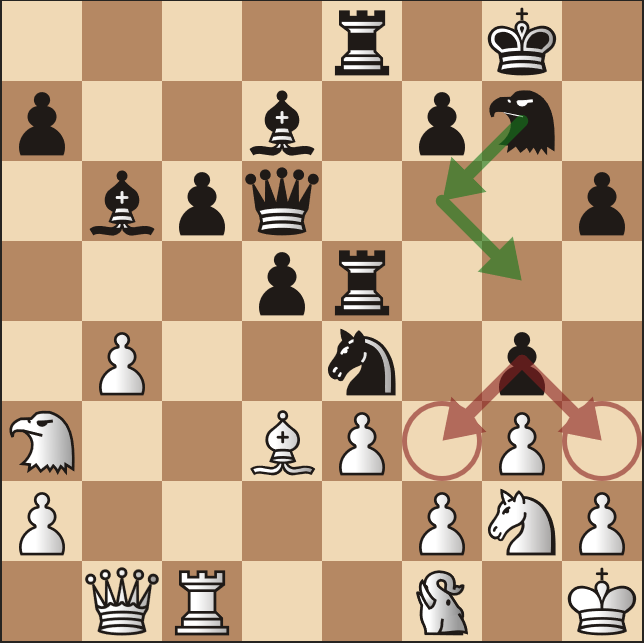
Instead, white tried 26. Hc2 c5 27. bxc5 Bxc5 28. Nf4 (see diagram below) but 28…Bc6 29. Kg1 Ne4 spelled the beginning of the end for white.
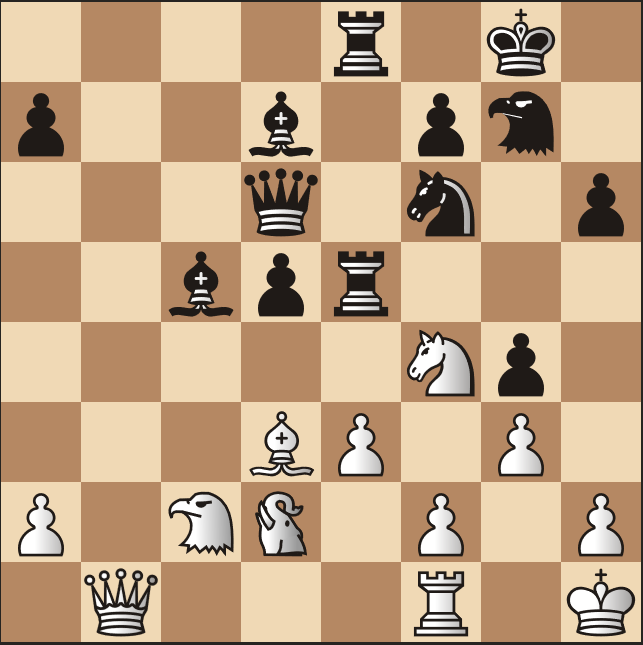
30. Bxe4 Rxe4 31. Qd1 appears to cause some trouble, but after 31…Hf6 black successfully secured the center (and the g-pawn). Notice how black’s pieces continue to restrict the activity of the white hawk, elephant, and queen.
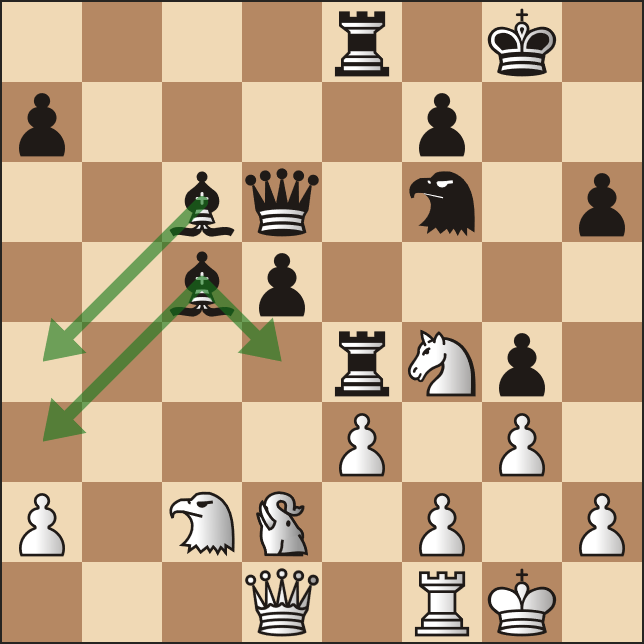
After 32. h3 gxh3 33. Kh2 Bb4 34. Eb1 Bd7 35. Hd3 Bg4, the final improvement of the black position, the pressure became overbearing for white.
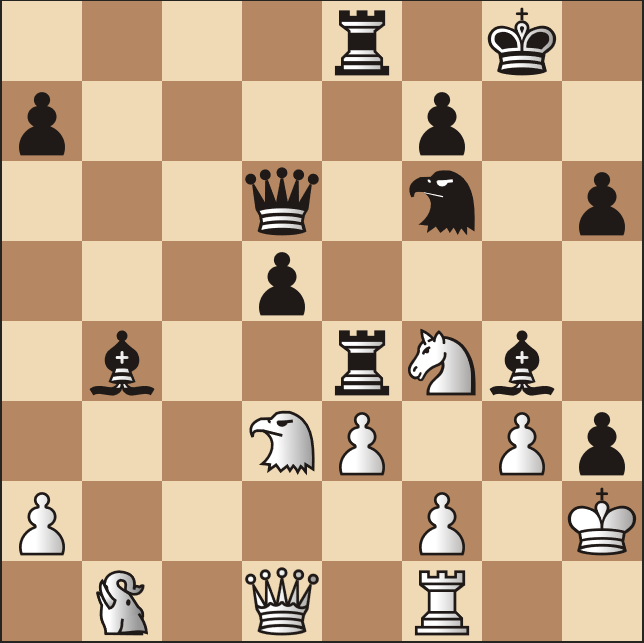
For instance, if white tries 36. f3 Rxe3 37. fxg4 Rxd3 38. Nxd3 Re3! threatens mate on g3, and after 39. Rf4 He4 black continues to pile on:
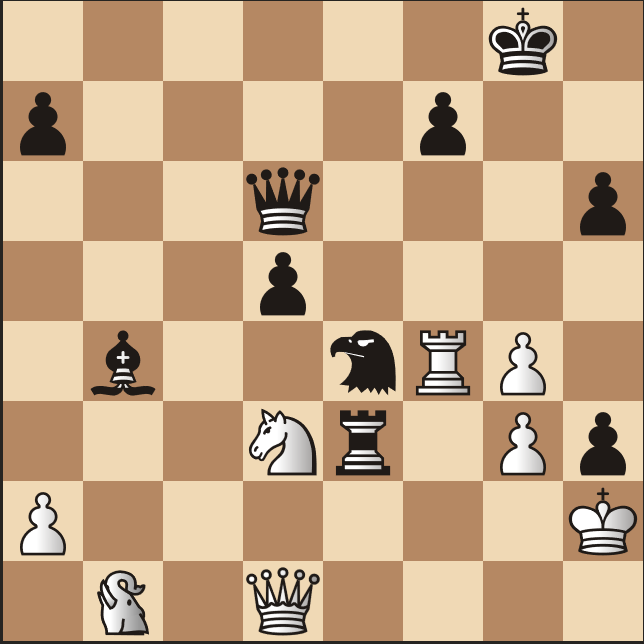
The hawk is immune in light of Rxe4 Qxg3 with mate coming on g2, and if Qg1 Hxd3 finishes off the game fairly handily with a massive material advantage in addition to the mating attack.
Instead, the game finished after the computer-esque defense of giving up all its material, with 36. Qe2 Bxe2 37. Hxe2 d4 38. Nh5 He5 39. Rc1 0-1 (by adjudication).
Is this game indicative of the idea that the addition of four extra pieces to the game deflates the value of the major pieces? Or, could it be taking Nezhmetdinov’s Qxf6 and claiming that two pieces are superior to the queen? It is hard to tell, since only other games can reveal the truth.
In the next game we will see a complicated middlegame with a gating of the Elephant on g8.
Game2
1. e4 c5 2. Nf3 Nc6/H 3. Bb5 g5!?
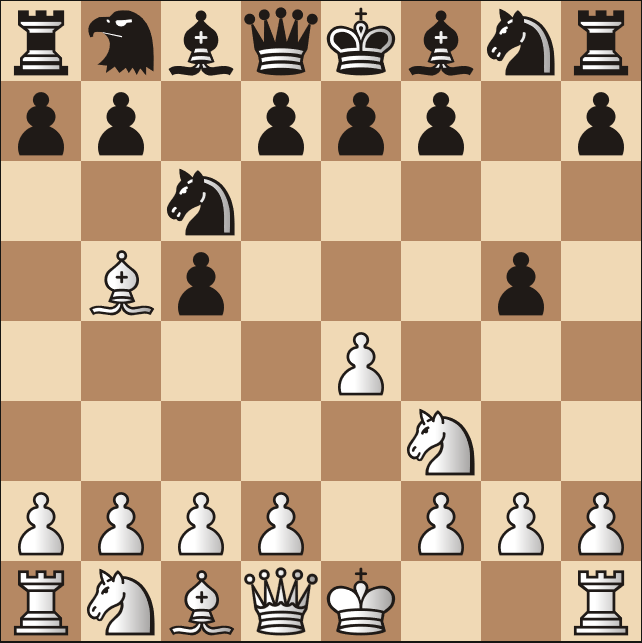
A highly aggressive thrust which will see an elephant likely gating on g8. If 4. Nxg5 Hf4 5. Qg4 Hd6 6. Bxc6 dxc6 and black would have a slight initiative.
4. h3 Nf6/E 5. Nc3 h6 6. d4!
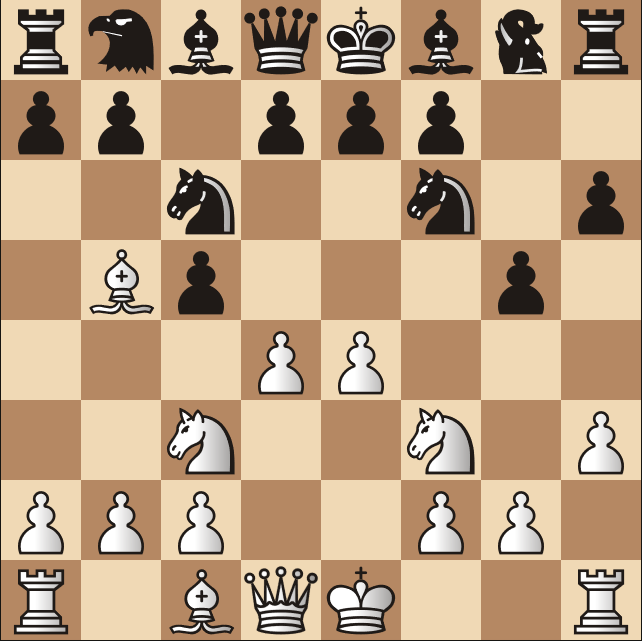
While black has their fun on the kingside, white strikes back in the center. Although this may seem a little strange with the Bb5, it is fully justified due to black’s early g5 push. Nevertheless, black’s control over the center, due to the excellent hawk on b8, ensures the solidity of their position.
6…cxd4 7. Nxd4 a6 8. Be2 e5
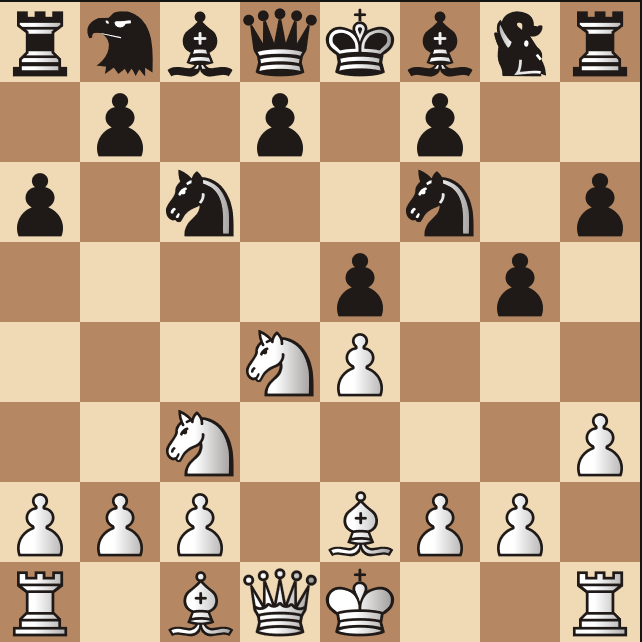
The game now takes a decidedly strange turn, and I’m still not sure about the objective quality of this move. On one hand, it makes sense to kick back white’s pieces, but on the other hand it is extremely antipositional, especially in conjunction with …g5.
Another plan could have been 8…Nxd4 9. Qxd4 Hc6 10. Qd1 d6 11. Be3/H Be6 with Eg6 and Bg7 coming up next, and black would be solid.
9. Nb3
An interesting option was 9. Nf5 d5 (d6 10. g4 and white takes control of the game) 10. Nxd5 Nxe4 (Nxd5 11. Qxd5/E and white remains up a pawn) 11. Nfe3 and white has a pleasant position.
9…Bb4 10. Bf3 d6 11. a3 Bxc3 12. bxc3 Eg6 13. a4 Na5 14. Qd3/E Kf8 15. Ba3/H
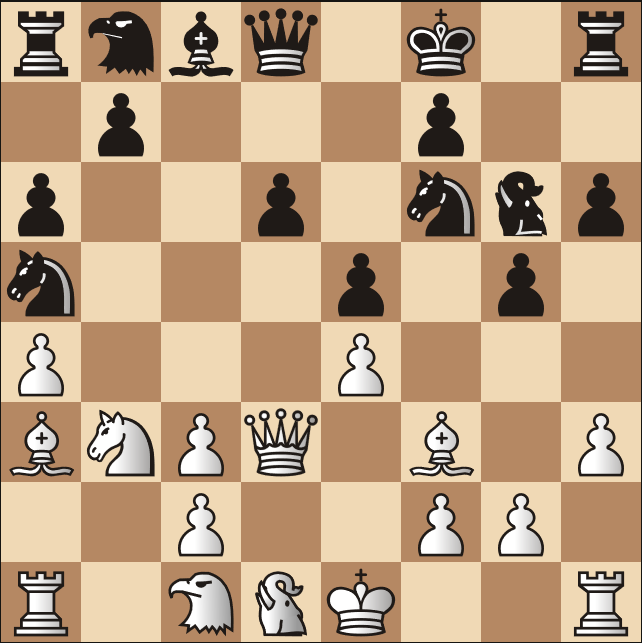
Both sides have gated their pieces, although neither side is fully developed. From white’s point of view, they have good pressure on d6 and are looking to coerce …Nxb3, in order to fix their pawn structure. Despite the doubled c-pawns, black’s pieces are simply not well coordinated enough to attack them, so white can claim that their slight space advantage is worth the structure disadvantage.
From black’s point of view, the elephant on g6 nicely guards black’s king, preventing h4 and other shenanigans. If black develops without issue, it might actually be white’s king that struggles to find a spot, since 0-0 would be undesirable due to …h5 and …g4, while 0-0-0 appears risky due to the exposed queenside structure, which could be opened with e.g. …b5.
15…Kg7 16. Bxd6 white goes pawngrabbing. Hc6 17. He3 (see diagram below) Nxb3
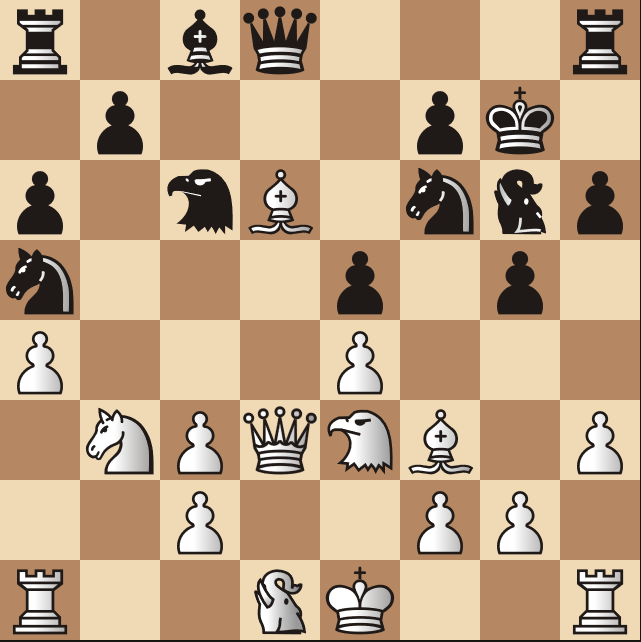
In this position a more natural move appears to be 17…Be6, with ideas of …Nc4, harassing the Hawk. However, white had 18. Nc5, when paradoxically the best move appears to be Bc8, as Bc4 allows Hf5+. Still, with ideas of …b6 and …Nb7, the position is complicated.
18. cxb3 Be6 19. Qc2 Qc8 20. Eb2 b5 21. 0-0-0
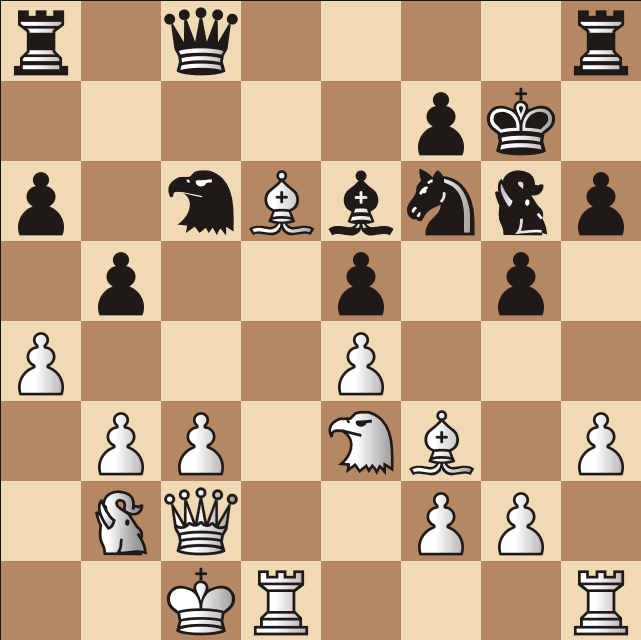
As mentioned above, castling short would have been quite dangerous for white, but this move still comes as a bit of a surprise. But if you look closely, you can see that both sides have elephants keeping their respective kings comfortable. As it turns out, it is not easy to coordinate black’s pieces to begin a serious attack.
21…Re8! This move is prophylaxis against Hf5+. Consider if the position was white to move. After 22. Hf5+ Bxf5 23. exf5, white has a double attack on the Hc6 and Eg6. After 23…Eh4 24. Bxc6 Qxc6 25. Bxe5 white would remain up a pawn. Thus, the purpose of 21…Re8 is to protect the e5 pawn against this combination.
22. Hb6 Qb7 23. Hc5 Qc8 24. Nb6 Qb7 25. Hc5 Qc8 26. Rd3
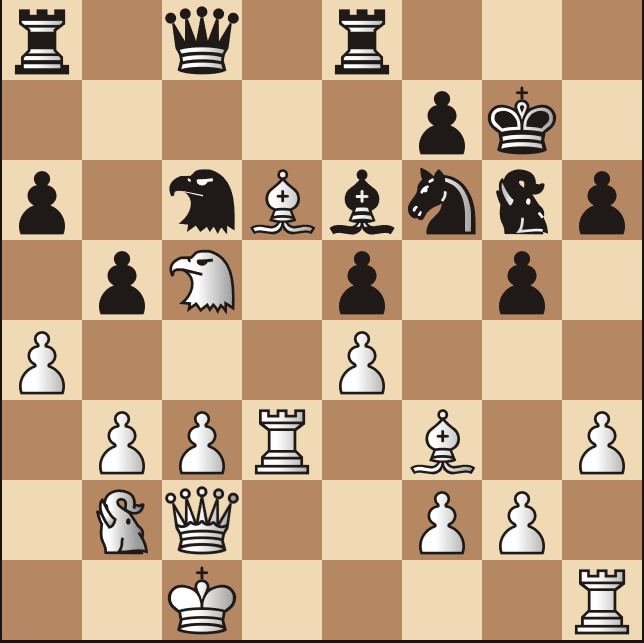
After a bit of hesitation, white decides to play on. Black, without any clear entry road on the queenside, which is covered fantastically by the white pieces, engages in a curious plan:
26…h5! 27. g4 h4!
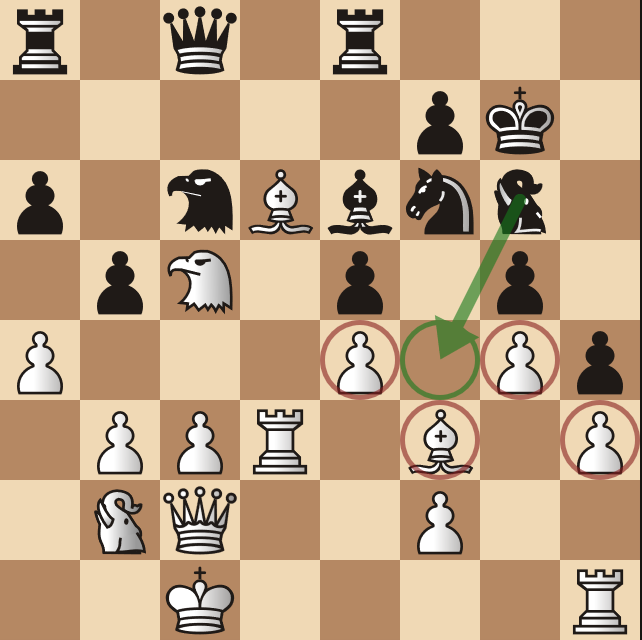
A very positional way of playing, securing the f4-square as a potential outpost for the elephant. Note that 27…hxg4? would have been completely against black’s style of play, because after 28. hxg4 Nxg4 the simple 29. Bxg4 Bxg4 30. f3 Be6 31. Rdd1 and white would have considerable pressure on the black king with moves like Qg2 coming up.
Suddenly, the position has become quite reasonable for black, as white is under pressure to prove something.
28. He3 played to secure the f4-square. bxa4 (see diagram below) 29. c4!
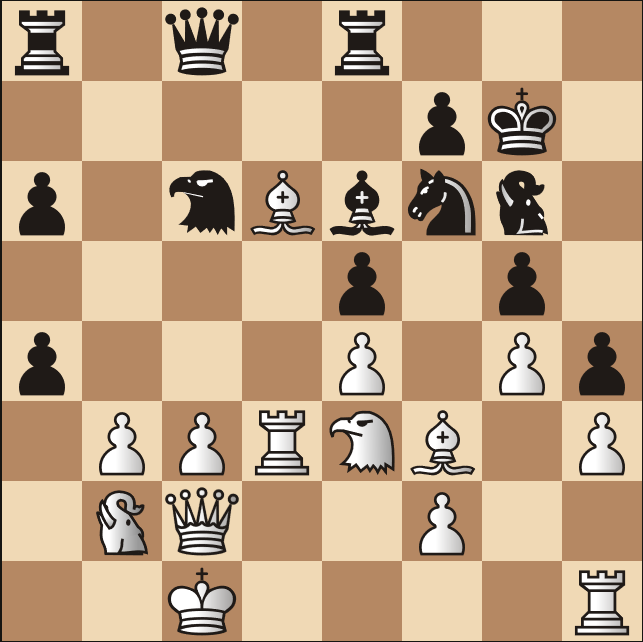
If 29. bxa4 Ra7! and Rb7 threatening to harass the white elephant would suddenly become quite annoying, as it does not have many squares left. Exb4 was also a possibility, and after Hxa4 bxa4 white would not be worse. Understandably, white was cautious about parting with their elephant.
29…cxb3 30. Rxb3 Ha7! Planning to trade off the hawks in order to get access to the f4 square. Now, white engages in a tactical flurry: 31. Hxa7 Rxa7 32. Rb8 Qc6 33. Rd1 Rxb8 34. Exb8 Qxc4
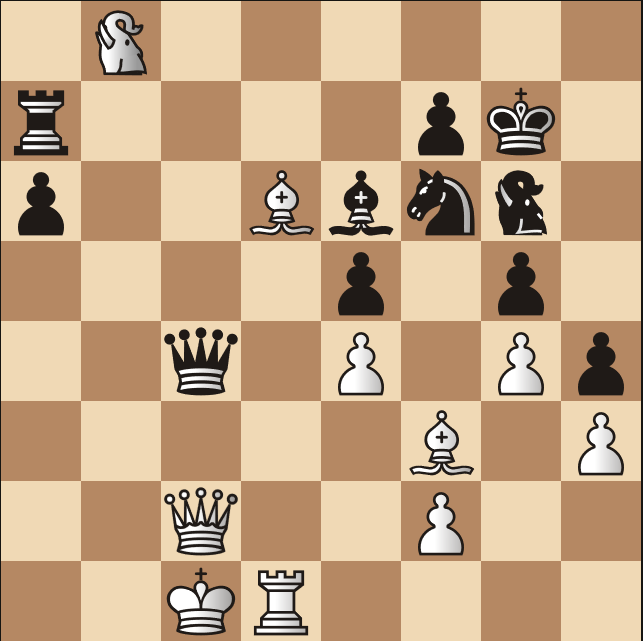
At first sight, this position appears quite good for black, as white’s king is wide open while black’s elephant covers the entry point f8 and the black knight covers e8. However, white has a trick up their sleeve:
35. Qxc4 Bxc4 36. Ec6! with a fork on the rook and bishop. However, black has a powerful counter-stroke: 36…Be6!! 37. Exa7 Ef4!
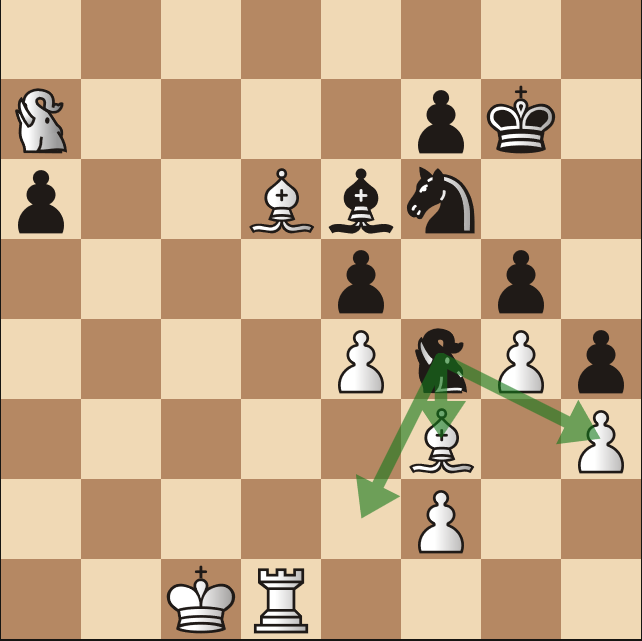
Down an entire rook, black’s elephant, which had been lying dormant since the very beginning, suddenly jumps into play with huge effect. On 38. Bh1?? Ee2 39. Kb1 Ba2 40. Ka1 Ec2 would even lead to mate. White therefore has no choice but to give up the bishop on f3.
38. Bxe5 Exf3 39. Bd4! Not the only move to save white, but a nice one regardless. For instance, on 39. Bb2 Exh3 40. Exa6 Exf2 both kings would be too weak to play for a win, and the game could end peacefully after 41. Ea8 Bb3 42. Ee8+ Kg6 43. Eh8+ Kg7, with a perpetual.
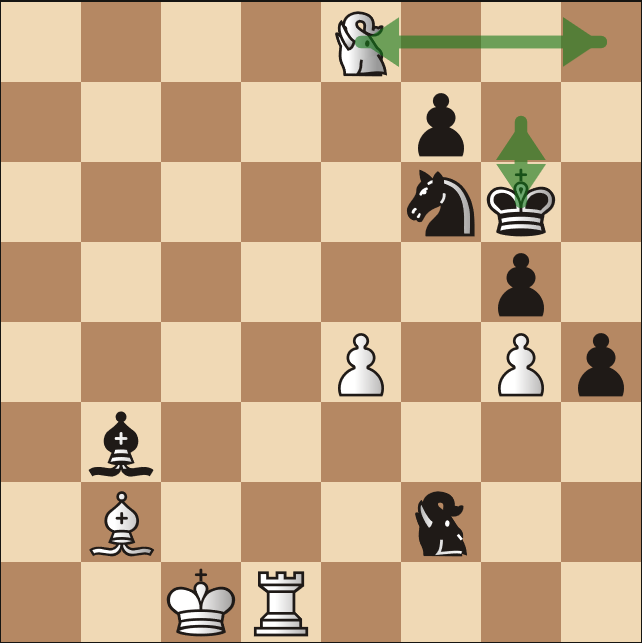
Instead, the game finished after 39…Eb3+ 40. Kc2 Exh3 41. Ea8 (threatening the sneaky Ee8+) Ea3+ and black forced a draw after 42. Kd2 Eb3+ 43. Kc2 Eb4+ 44. Kc3 Eb3+ (see diagram below)
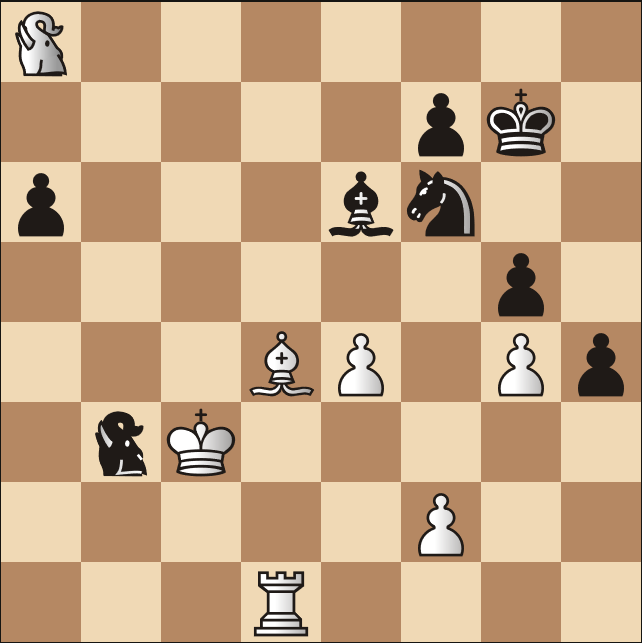
45. Kc2 Ea3+ 46. Kd2 Eb3+ 47. Kc2 ½-½ .
A fighting game from both sides!
Game 3
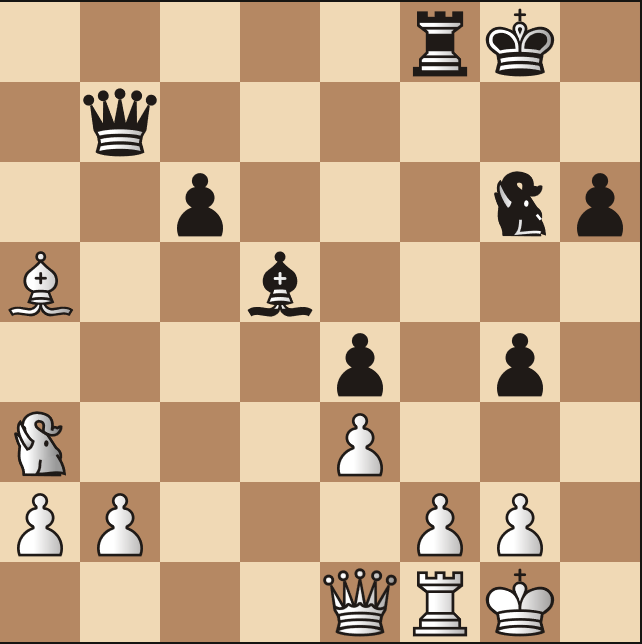
The opening of this game was relatively uninteresting, but now clouds have started storming around the white king. Oblivious to this fact, (and also as a being borne of silicon) white played 1. b3, a highly cold-blooded move. Black replied with 1…Qf7 2. Bb6 as it turns out, it is necessary to open up the possibility for Ea7 to gain counterplay Qf3!!
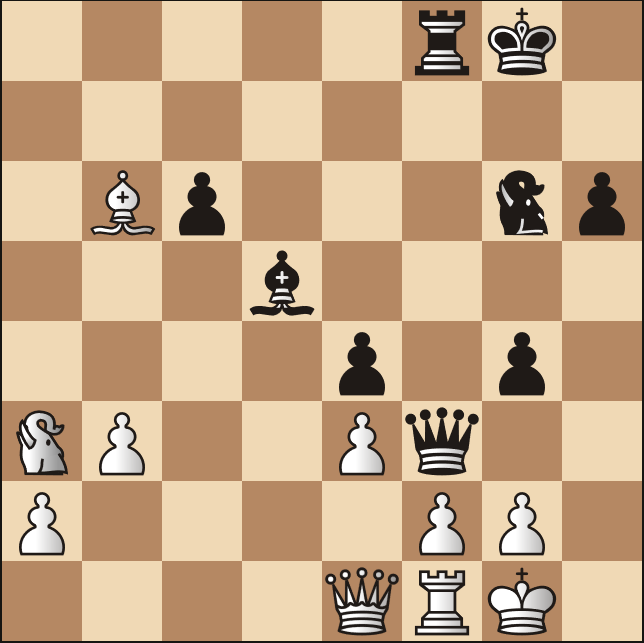
The idea is fairly clear: On 3. gxf3 gxf3 white faces a swift execution with 4. Kh2 Eh4+ 5. Kg3 (Kg1 Eh3) Eg2 6. Kh3 Be6 mates. If white does not move swiftly, the idea is simply …Eh4 4. gxf3 gxf3 and there is no way to stop …Eh3 mate!
Thus, white barely clinging on, summons their last vestige of resources with 3. Ea7! Now, if 3…Eh4?? It is white who has the mating attack with 4. Ee7 Kh8 5. Bd4 Rf6 6. Bxf6 Qxf6 7. Ee8+, picking up the queen. Instead, black must spend a move for defense with 3…Bf7.
But white isn’t finished yet! Pulling out all the stops, white utilizes this tempo to bring the queen into the attack as well with 4. Qb4!
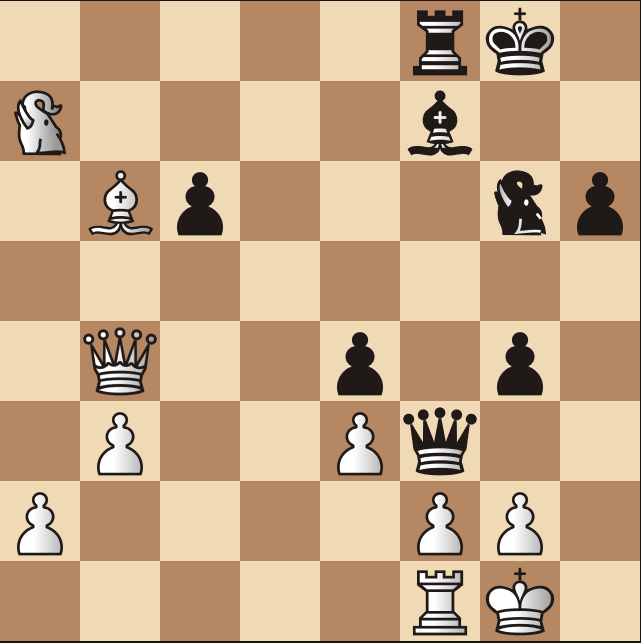
Now, as on the previous move, black has a draw with 4…Qxg2 5. Kxg2 Eh4+ 6. Kg3 Eh3+ 7. Kg2 (if Kxg4?? Be6 mates) Eh4+ with a perpetual. Instead, black eschews this for 4…Eh4 5. Ee7+ Kh7 6. Qxe4+ Qxe4 7. Exe4
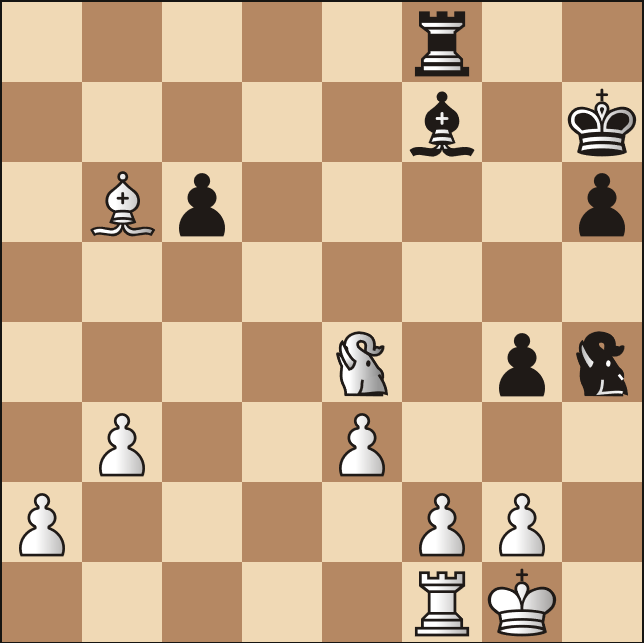
You may think that with the queens off the board, white can breathe a sigh of relief. Black, now completely in berserk mode, continues the attack with 7…Bd5!
Now, 8. Ee7+ would lose completely to Rf7, after which the devastating Exg2 is threatened. So instead, white is forced to play 8. Eg3, allowing Bxg2!
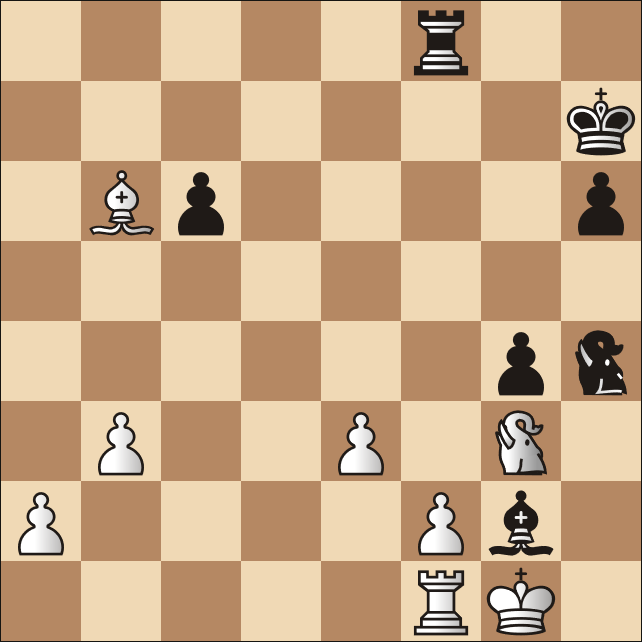
Now, if 9. Exg2 Eh3 mates, so white must move the rook. After 9. Rd1 Bd5 white must now contend with the massive threat of …Rf3, displacing the Elephant. For instance, on 10. a4?? Rf3 11. Eg2 Eh3+ 12. Kf1 Eh1+ 13. Ke2 (see diagram below):
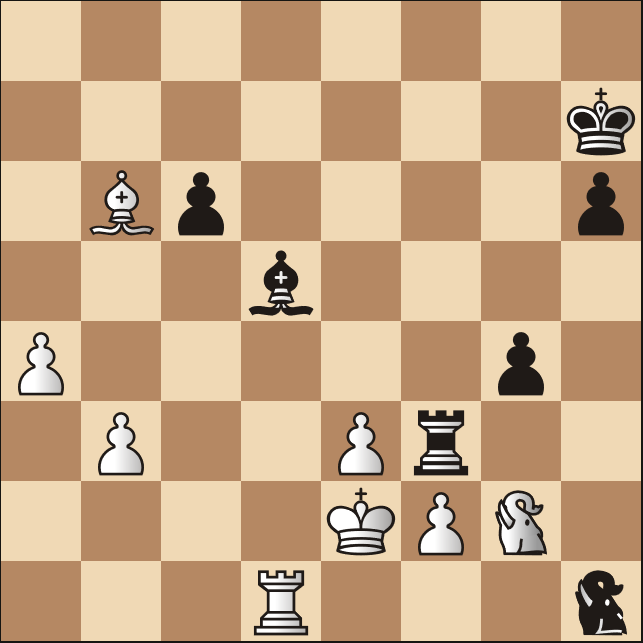
13…Rxf2+! 14. Exf2 Bf3+ and black would win the elephant and the game. To avoid this, white found the absolutely remarkable 10. Bd8!!
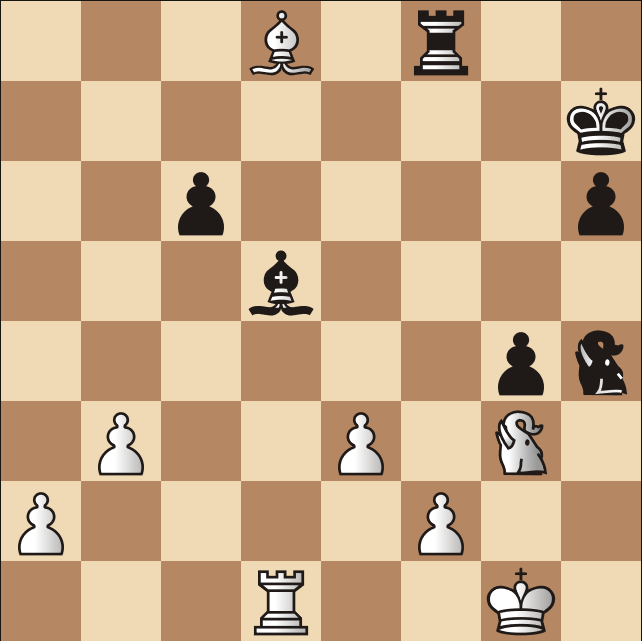
A move found only in the iciest veins of an engine, deflecting the Rf8, if only for a moment. Now if 10…Rxd8 11. e4 Rf8 12. exd5 Rf3 white has 13. Ee4!, which miraculously holds everything as the Elephant protects f2. Now black themselves must be careful of Ee7+, so the position remains balanced. Instead, black cooling ignored Bd8 with Eg6!, continuing the threat of Rf3. After 11. e4 Rf3 12. Ee2 black went all in with g3!
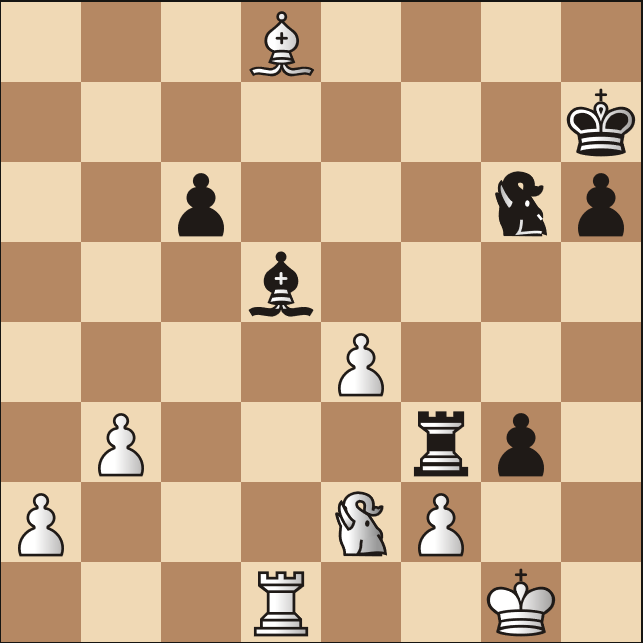
It is clear that white cannot live by normal means: for instance, 13. fxg3 Rxg3 14. Kf1 Be6 and black would have a devastating attack. Instead, 13. exd5 is forced. After exf2+ 14. Kf1 Rg3 white still had to be careful. For instance, if 15. Exf2?? Rg1+ 16. Ke2 anticipating a position with rook+bishop vs elephant, white instead face a much worse fate after Eg3+ 17. Kd2 Rg2:
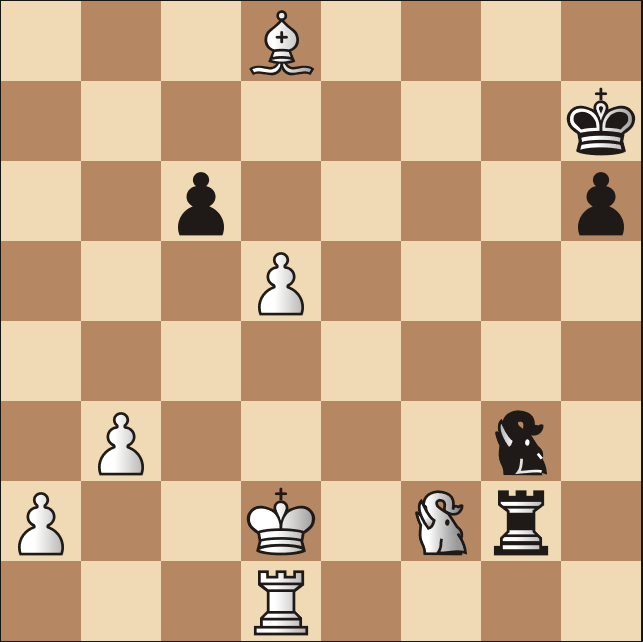
On 18. Exg2 Exg2+ white cannot avoid losing the rook: 19. Kc1 Exa2 20. Kb1 Ec3+; 19. Kc3 Exa2 20. Kd4 Ec2+ and white will lose the rook the next move. Instead, after 18. Bb6 black can hammer in the victory with c5!! where 19. Exg2 would be similar to the previous lines. And after 19. Bxc5 Ee4+:
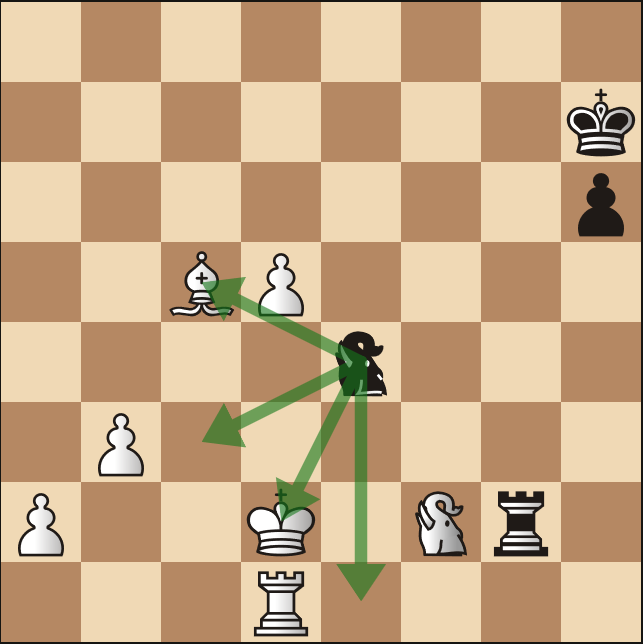
White is forced to lose even more material as Exc5 comes with check.
Instead, white avoided all of this with a timely 15. Ee7+!
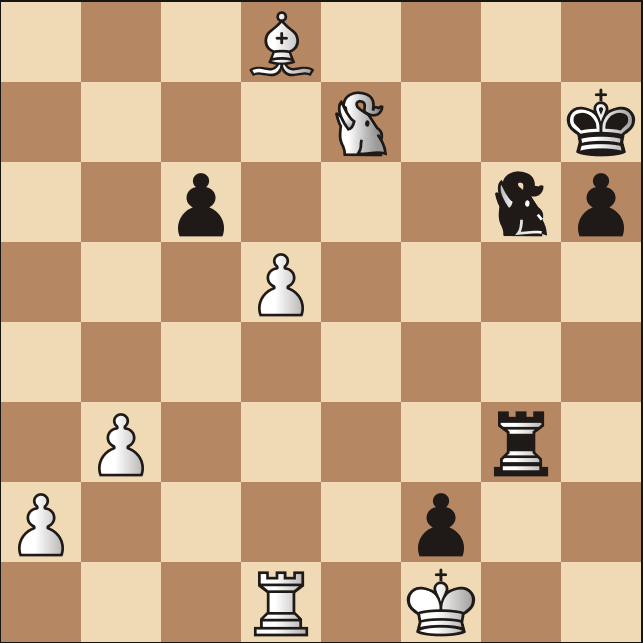
After Exe7 16. Bxe7 Rg1+ 17. Kxf2 Rxd1 18. dxc6 Rc1 the game reached a balanced endgame which was later drawn. One of the most fascinating sequences I have seen, and one that encapsulates the richness of s-chess.